
The hum of the reactor grew louder as Mio drifted through the derelict station, her internal diagnostics flashing red. A corrupted drone, bristling with weaponry, rounded the corner. Desperate, she activated a newly discovered Modifier, praying it was the upgrade she needed to survive. What if it’s a dud?
Modifiers in MIO: Memories in Orbit are your lifeline, akin to finding that perfect tool in a broken-down spacecraft. These enhancements bestow Mio with diverse abilities, from displaying enemy health to bolstering her defenses. Finding and equipping them is paramount, but the ship doesn’t give up its secrets easily.
Some Modifiers are available for purchase, but most are hidden throughout the vessel. They might be tucked away in concealed areas or locked inside chests, just waiting to be discovered. Remember, the number you can equip depends on your Modifier slots, so plan wisely.
Seeking Out Every Modifier
Think of a Modifier as a rare bloom in a forgotten garden. Finding them can be a challenge, but the rewards are significant. This guide is designed to help you locate each one within the game.
Disclaimer: This table is a work in progress. We will add more Modifiers to it as we find them.
| Modifier | Effect | Location |
|---|---|---|
| Afterimage | Using the Hairpin generates a decoy enemies will target first. The decoy explodes after a short delay. | In <redacted> (under Metropolis), across from where you find the <redacted> Torn Overseer. |
| Alexander’s Fate | Nacre droplets are no longer lost on death. | Directly next to the Canopy Overseer station. |
| Analyser | Display enemies’ remaining health. | Received from Rad after freeing him from the door. |
| Counter Measures | Dodging an attack applies the “targeted” status to the enemy. | In the bottom floor of the building across the bridge from the Blood’s Sanctum. Reached from the west side of the building. |
| Defective Core | Increases the number of Modifier slots, but disables the protective core completely. | Obtained after delivering all of the Candles to the Shard of the Eye. |
| Defense Mechanism | Creates an explosion around Mio when she takes a hit. | In the Feral Undergrowth, reached by using three pink flowers to reset your jumps. |
| Defragmentation | Getting hit by an enemy generates an Energy Shard. | Purchase for 3 Old Cores and 400 Nacre (€3.70) in Mel’s Defective Mods. |
| Effective Dismantlement | Enemies leak a lot more Nacre Droplets when dying. | Purchase for 200 Nacre (€1.85) in Mel’s Scuffed Selection. |
| Energy Leecher | Large increase to energy recovered when attacking an enemy. | In Haven, two floors down from the Bell Tower Overseer and one room to the right. |
| Enhanced Dodge | Dodging attacks has an increased timing. | In a chest after defeating the Poltergates below the City Gates fast-travel point. |
| Extra-Coating Processor | Creates an extra layer of protection (non-stackable) for every 3 enemies defeated. | In the hallway with a Gloomwater pump in the Vault. |
| Firefly | Using the Sail generates a static storm around Mio that deals damage to enemies over time. | Behind a wall on the right of the uppermost Haven chamber. |
| Foolish Ideal | Damage inflicted on enemies is increased when energy is not fully charged. | The Tremor House in the Metropolis, two floors down from the City Hall Overseer. |
| Glitch Trail | Leaves a trail that hurts enemies when using Hairpin on any target. | At the top left corner of the chamber directly southwest of where the Breath is located in Haven. |
| Gratitude | Restores an extra layer of protection (non-stackable) when Mio stays on the ground for a certain period of time. | Purchased from Mel for 1 Nacre after saving her from Debby. |
| High-risk Voucher | Allows Mio to purchase an extra layer of protection at Nacre Basins. | Across the goo-filled hallway from the Nacre Basin in the saw-filled room in the labs. |
| Imperfect Focus | Increases the number of Modifier slots, but the timing for dodging attacks is reduced. | Behind the ice blaster in Dwellings. |
| Kinetic Thrust | The last attack of the combo deals more damage. | In a glass chamber in Foundations, reached by venturing through a tunnel in the Dwellings. |
| Maintenance Hack | The Protective Coat repair at Nacre Basins is free. | Purchase for 150 Nacre (€1.40) in Mel’s Scuffed Selection. |
| Makeshift Recovery | Quickly defeating an enemy that has hit Mio restores one extra layer of protection (non-stackable). | Two rooms (upper) to the left of the Bell Tower fast travel location. Use your Striders to climb the wall above the first flower. |
| Nacre Drought | Increases the number of Modifier slots, but Nacre Basins stay dry. | In the Bell Tower Station, on the body of a robot. Reached by following the crystallized path to the left of the elevator in the Bell Tower. |
| Pain Conversion | Energy recharges when taking damage. | Purchase for 300 Nacre (€2.80) in Mel’s Defective Mods. |
| Perfect State | High increase of the damage inflicted on enemies when all layers of protection are active. | Purchased from Xelato in Haven for 10,000 Nacre (€92.50). |
| Portable Crystalizer | Converts some Nacre Droplets dropped by enemies into Crystallised Nacre. | Purchase for 600 Nacre (€5.55) in Mel’s Defective Mods. |
| Protective Overlay | Grants an additional layer of protection. | Looted from a locked chest in just west of the L1: The Spine elevator lcoation. |
| Reduced Latency | Quicker recovery after getting hit. | Purchase for 1 Old Core and 350 Nacre (€3.25) in Mel’s Worn Out Gears & Parts. |
| Resources Shortage | Increases the number of Modifier slots, but enemies drop fewer Nacre droplets when defeated. | In Haven, below the bridge where Oiwa stands. Use the downward dash to get to it. |
| Sharpened Hairpin | Grants the ability to slice enemies when using Hairpin on them. | On an upper ledge of the Hall of History in the Metropolis, behind the door using the Old-fashioned Key. |
| Splintering Dodge | Dodging an attack creates an energy shard. | To the left of the first goo door in the labs. In a room with saws and a switch. |
| Split Process | Increases the number of Modifier slots, but energy recharges more slowly. | To the left of where you become Dr. Halyn’s assistant in the labs. |
| Sunsail | Increases gliding speed while using the Sail, but also increases its energy consumption. | In the tunnels southeast of the Observatory where pink webbing is. |
| The Hand’s Greed | Damage inflicted on enemies increases for every layer of protection Mio has lost. | In a container in Haven, just to the right and up of where the Crow is. |
| The Heart’s Favourite | Energy recharges quicker when on the ground. | Purchase for 3 Old Cores and 400 Nacre (€3.70) in Mel’s Defective Mods. |
| Thinner Frame | Increases the number of Modifier slots, but removes one layer of protection. | Purchase from Mel for 1 Old Core and 300 Nacre (€2.80) in Mel’s Worn Out Gears & Parts. |
| Wild Cat | After using the Hairpin, the next attack will be a heavy strike that inflicts a lot more damage to enemies. | In a small hallway all the way to the left of the L1: Pendulum’s Panorama in the Bell Tower. |
How do I get more Modifier slots in MIO: Memories in Orbit?
Modifier slots are the gateway to enhanced capabilities. Starting with a limited number, you’ll soon realize the need for expansion. Visit Mel at Dr. Halyn’s Restoration Bench. For one Old Core and 200 Nacre (€1.85), you can purchase Modifier Extensions, opening up new possibilities for Mio’s build.
Equipping Your Modifiers
Only a select few Modifiers can be active simultaneously. MIO: Memories in Orbit demands strategic decisions. The number of Modifiers you can equip hinges on available slots and the cost of each Modifier. For instance, Resources Shortage demands a hefty 20 slots. Unequip another Modifier if you don’t have enough available space. Think carefully about the tradeoffs.
To configure your loadout, locate any Overseer station scattered throughout the world. Select “Modifier Centre” to view your collection and slot availability.
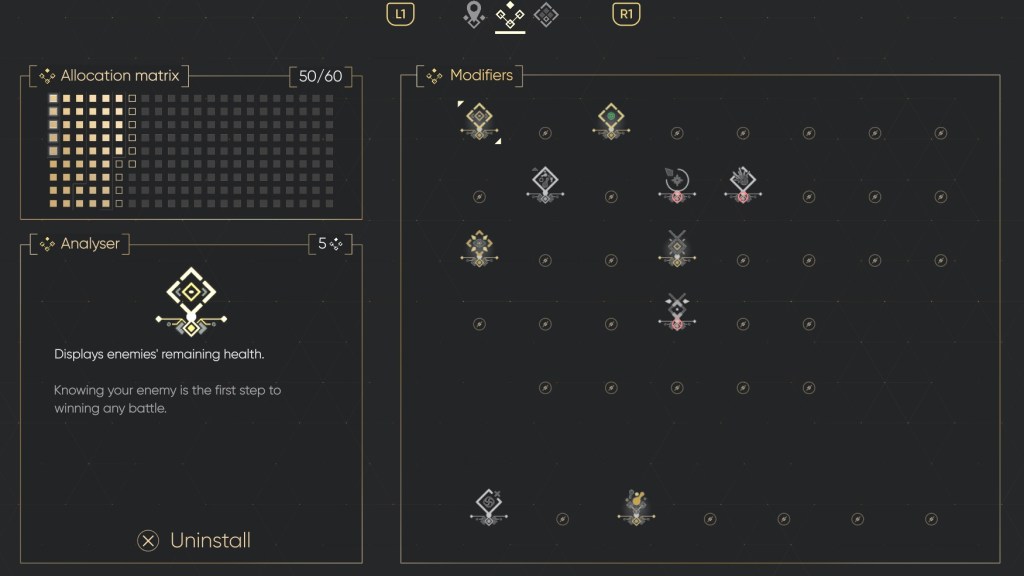
The “Allocation Matrix” displays available slots on the screen’s left side. Dark boxes with gold outlines represent open slots, while filled gold boxes denote equipped Modifiers. Gray slots indicate unavailable slots, meaning they cannot be used. Understanding this display is key to crafting your builds.
What are the best early game Modifiers to get?
Early in MIO: Memories in Orbit, survivability is paramount. The Analyzer, obtained from Rad, is a huge boon, letting you see enemy health. Effective Dismantlement, costing a mere 200 Nacre (€1.85) from Mel, greatly increases Nacre drops, accelerating your upgrade path. Don’t underestimate Protective Overlay for the additional layer of protection.
Are there any Modifiers that change the gameplay significantly?
Absolutely. Defective Core exchanges your protective core for more Modifier slots, a high-risk, high-reward option for advanced players. Sharpened Hairpin grants the ability to slice enemies with the Hairpin, opening entirely new combat strategies. Consider how these drastically alter Mio’s fighting style to determine if the tradeoff is worth it.
The right Modifiers can turn Mio from a vulnerable explorer into an unstoppable force. Which combinations will you discover to dominate the ship’s corrupted systems?