I once stepped into a boss room with one healing slot and no idea what I’d actually picked up. You know that small sick lurch when the enemy lands a hit and your only hope is a tiny trinket you barely remembered. That moment taught me to treat every dropped item like a decision that could change a run.
I’ve played enough Mortal Shell 2 to map the items that matter. I’ll walk you through what each thing does, what you can sell, and the handful you should never shrug off. Read this as a fast reference and a set of small strategies you can test on your next play session.
I counted spare change on my kitchen table and noticed how games mirror small economies. Complete list of items in Mortal Shell 2
The table below lists every item you’ll find, whether it’s a permanent equipable, a resource for upgrades, or a straight-up treasure you can sell. I fixed typos and clarified effects so you can scan and act quickly.
| Item | Nature | Function |
|---|---|---|
| Blackmarrow Key | Mechanic | Opens locked treasure in Marrow Keep |
| Bloodseed | Equipable | Cures Bloodcurse and removes ongoing damage |
| Burnt Effigy | Equipable | Cures Burn and removes ongoing damage |
| Coin | Resource | Currency for purchasing upgrades |
| Coin of Mammon | Treasure | Sell for 500 Coins |
| Common Moonshine | Equipable | Reduces damage taken and restores health |
| Devout’s Chalice | Treasure | Sell for 100 Coins |
| Galvanic Shard | Equipable | Cures Lightning and removes ongoing damage |
| Glimpse | Resource | Spend on Harbinger upgrades |
| Gloom | Resource | Spend on Harbinger upgrades |
| Grisha Remnant | Equipable | Summons a Grisha companion during fights |
| Marsh Pearl | Treasure | Sell for 2000 Coins |
| Martyr’s Ash | Equipable | Cures Frost and removes ongoing damage |
| Mether’s Breath | Resource | Required to fast travel between beacons or return to Marrow Keep; also used to cleanse Corruption |
| Muradean Tome | Treasure | Sell for 1500 Coins |
| Paradoxical Scripture | Equipable | Cures Stasis and removes ongoing damage |
| Revered Gland | Resource | Consumes at a Beacon to raise your ability to use Mether’s Pulse |
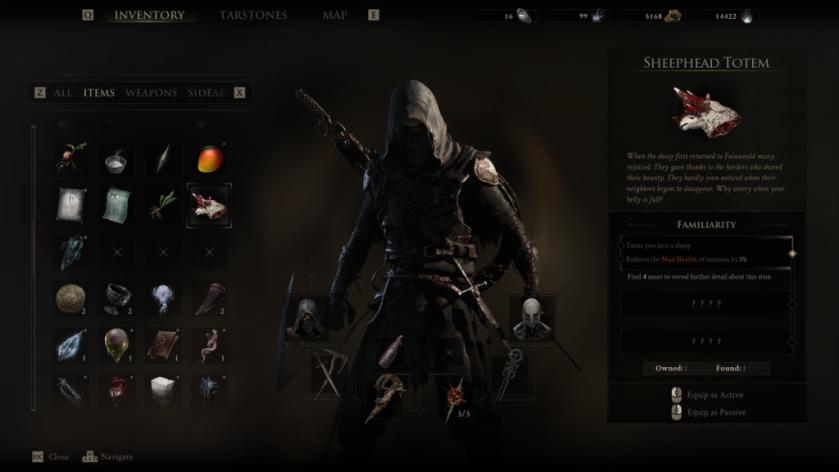
| Sheephead Totem | Equipable | Reduces the max health of enemies |
| Synaptic Vessel | Resource | Increases efficiency of Mether’s Pulse |
| Tarspore | Equipable | Cures Poison and removes ongoing damage |
| Tooth of Nochte | Treasure | Sell for 2000 Coins |
| Trollweed | Equipable | Function uncertain—expect an update as I test interactions |
| Weltcap | Equipable | Restores health and grants health regeneration |
| Winterglass Gem | Treasure | Sell for 1000 Coins |
I file receipts and notes in a small notebook; inventory lists deserve the same habit. How to read the table fast and use these items
You don’t need to memorize the whole list. Scan for three things: whether it’s equipable (permanent), a resource (spendable), or treasure (sellable). Equipables are the real game-changers for builds — treat them like permanent talent points.
What items are in Mortal Shell 2?
Everything above appears in the table: status-curing consumables (Bloodseed, Tarspore), stat-affecting equipables (Sheephead Totem, Weltcap), resources for Harbinger upgrades (Glimpse, Gloom), and sellable treasures worth straight Coins.
How do equipable items work in Mortal Shell 2?
Equipables slot into your build and remain until you swap them out. Some remove status ailments, others change enemy stats or grant passive regen. Think of your loadout as a Swiss Army knife: each tool has a specific moment when it turns the tide.
Which items should I sell?
Treasure items (Muradean Tome, Marsh Pearl, Tooth of Nochte, Winterglass Gem, Coin of Mammon, Devout’s Chalice) convert directly to Coins. If you need upgrades or Revered Glands, sell duplicates or high-value treasures to get fast progress. I check Fextralife and Reddit threads for market priorities and patch notes, and keep an eye on Moyens I/O coverage for fresh drops.
The most valuable class is equipables. They change how fights play out and stack with Harbinger upgrades purchased through Glimpse and Gloom. If you’re using Steam or consulting guides on Fextralife, cross-reference item names from the table — some community pages list exact spawn locations.
I’ve watched casual players hoard everything until it becomes chaos; a little pruning wins fights. What to keep, what to sell, and priorities
Keep these unless you already have stronger versions: Sheephead Totem (mass enemy debuff), Weltcap (steady regen), Grisha Remnant (extra AI ally). The Sheephead Totem is a lighthouse in a storm when you’re overwhelmed: it turns mob encounters from slog to manageable.
Sell one-off treasures unless you’re chasing a specific coin total for a Harbinger tier. Use Synaptic Vessels and Revered Glands to amplify Mether’s Pulse—these are the leverage you use mid-game to smooth out repeated failures.
If you like testing, track Trollweed: I’m still experimenting and will update as I confirm interactions with Harbinger perks and Mether mechanics. For now, treat it as experimental and don’t rely on it for critical runs.
If you want quick reference in-game, make a note in Steam’s overlay or a checklist in your phone—small reminders prevent expensive mistakes in Marrow Keep or during speed runs.
I’ve mentioned community tools (Fextralife, Reddit), press coverage (Moyens I/O), and the Steam storefront because they’re where the most accurate, player-tested info lives. Cross-check there when you find a rare item or a suspect tooltip.
Which item are you hoarding that will secretly change your next run?