
You launch Call of Duty Modern Warfare 4, hit Play, and the game refuses to let you in. I’ve watched players rage at a frozen lobby only to discover the problem lives in firmware settings. The fix is boring, low-level—and perfectly manageable.
I’ll walk you through why Secure Boot and TPM 2.0 matter for Modern Warfare 4’s online modes, how to check them, and the exact steps to turn them on so you can stop losing matches to a settings mismatch. I’ve seen this break down for both new rigs and hand-me-down laptops; the answer sits in the BIOS and a few Windows tools.
Your PC does tiny background checks every time it starts. What those checks are and why MW4 cares.
The plain language: Secure Boot keeps untrusted code from loading during start-up, and TPM 2.0 provides hardware-backed cryptographic services your system can use to vouch for itself. Together they make a stronger platform for anti-cheat systems.
Think of Secure Boot like a bouncer at a club who only lets known faces through the door. TPM 2.0 is a safe-deposit box inside the club where the bouncer can store a verified key. Activision’s Modern Warfare 4 beta uses RICOCHET Anti-Cheat and expects both of these measures to be active before it opens the online gates.
What is Secure Boot and TPM 2.0?
Secure Boot is part of modern UEFI firmware and prevents unsigned or tampered bootloaders from running. TPM 2.0 (Trusted Platform Module) is a small chip or firmware module that stores keys and performs cryptographic tasks on the hardware level.
Why does RICOCHET need them?
Anti-cheat systems like RICOCHET rely on an environment they can trust. Secure Boot reduces the attack surface at startup, and TPM makes it harder for attackers to spoof machine identity or tamper with protected values. Activision, Infinity Ward, and similar studios have been adopting these checks to reduce kernel-level cheats and persistent trainers.
You can check Secure Boot in moments using a built-in Windows tool. Here’s the quick path.
Press Windows + R, type msinfo32, and press Enter. In the System Summary look for Secure Boot State.
- If it reads On, you’re already good for Secure Boot.
- If it reads Off or Unsupported, you’ll need to enable Secure Boot from your PC’s UEFI/BIOS.
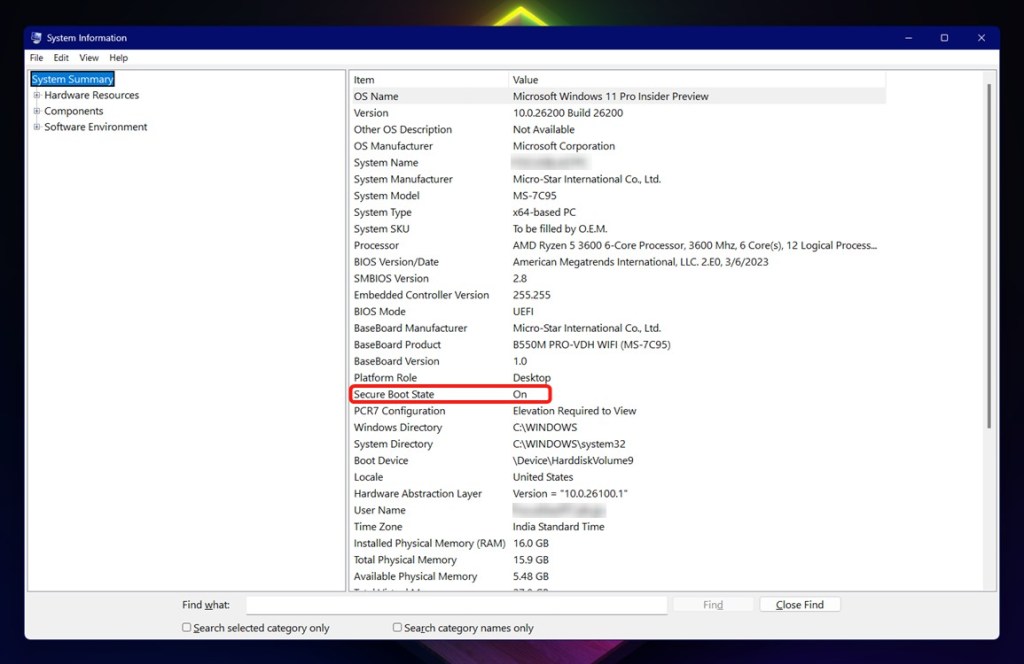
Because Secure Boot is controlled by your motherboard’s firmware, the exact menu path varies by vendor. Common labels inside the UEFI are Secure Boot Control, Boot → Secure Boot, or similar. On gaming PCs you’ll often find it under Advanced or Security.
If you need step-by-step guidance, consult your motherboard or laptop manual, or use the Windows 11 Secure Boot guides on Microsoft’s support pages and vendor knowledge bases like ASUS, MSI, Gigabyte, or Dell.
A quick check of TPM takes less than a minute—and then there’s the one extra partition detail to handle.
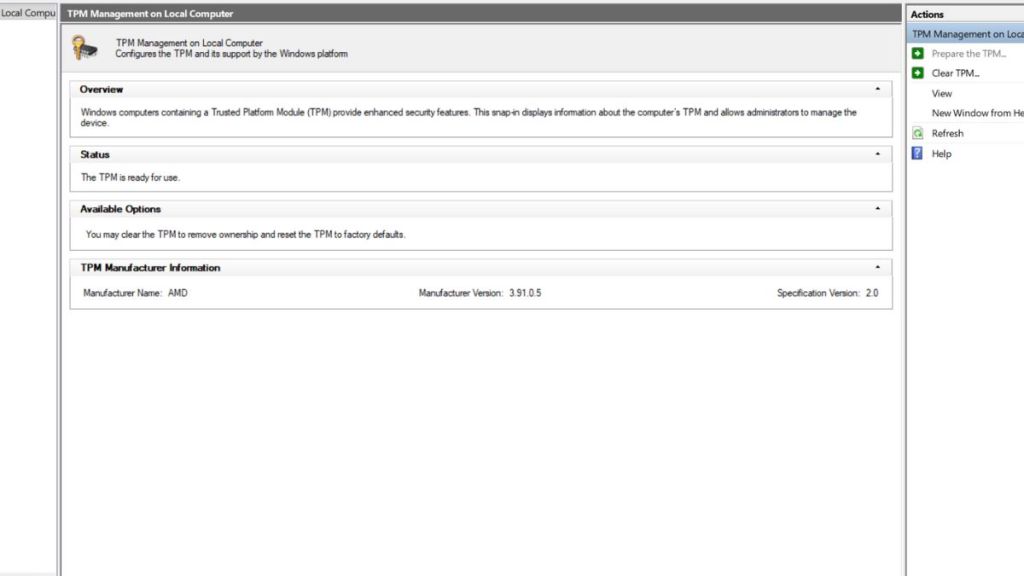
Open Run, type tpm.msc, and press Enter. The TPM Management console will show whether a TPM is present and if it’s ready to use.
- If the status reads The TPM is ready to use, TPM is active.
- If it says Not ready or the tool reports no TPM, you’ll need to enable Intel PTT or AMD fTPM in your UEFI, or switch on a discrete TPM module if your board uses one.
Before you flip TPM on, check your system disk partition style. TPM and Secure Boot are part of the modern UEFI stack, and Windows expects a GPT partition style for native UEFI boot.
- Right-click Start → Disk Management.
- Right-click the system disk (usually C:), pick Properties, then Volumes to see the Partition style (MBR or GPT).
If your drive is MBR, you can convert to GPT with Microsoft’s built-in tool mbr2gpt or by following Microsoft Docs’ guide for converting a disk to GPT. Back up before you touch partitions—this is a one-way system change if done without care.
To enable TPM: reboot into your UEFI/BIOS and search for Intel PTT or AMD fTPM (or Security Device Support on some boards). Turn the option on and reboot. After that, tpm.msc should report the TPM as ready.
How do I convert MBR to GPT without losing data?
Windows 10 and 11 include mbr2gpt, which can convert a system disk without formatting in many cases. Still, make a full backup and follow Microsoft’s instructions on the tool page to avoid a broken bootloader.
You will hit a hard stop at matchmaking if either requirement is missing. That happened before with other Call of Duty betas.
Short answer: no. Modern Warfare 4’s multiplayer and other online modes require both Secure Boot and TPM 2.0 active. Players without both enabled have reported being blocked from matchmaking and unable to claim beta rewards.
Can I play Call of Duty Modern Warfare 4 without Secure Boot?
There’s no supported bypass. Past betas, like Black Ops 7, used the same hardware checks, and studios use these barriers to limit kernel-level and persistent cheats. Trying to spoof or patch the client risks account action—RICOCHET runs kernel drivers for low-level checks, and tampering can lead to bans.
If you use a custom OS setup, old hardware, or tools that modify boot behavior, expect to spend time aligning firmware settings with what the game expects. On mixed-boot systems, switching to a pure Windows UEFI install with GPT often resolves the conflict.
I’ve guided dozens of readers through this exact sequence: check msinfo32, run tpm.msc, verify GPT, flip Intel PTT or AMD fTPM, and re-test the game on Battle.net or the Modern Warfare launcher. If you want, I can walk you step-by-step over a screen share or in the comments—what’s your rig and what did you see on msinfo32?