
I surfaced behind a coral arch and watched a player hand over an Apex shark like it was a spare sock. My chest tightened — that was an Aurora Totem I wanted. I swore I’d learn the fastest route to those rewards and spare myself the guesswork.
I play, test, and write guides for Roblox content every week, and I’ll walk you through Fisch’s Shark Challenges so you spend more time farming and less time wandering undersea. You’ll get exact locations, mission patterns, and a clear list of what each challenge can drop. Treat this as the short game plan that keeps you focused when the menu feels random.
How to start: I see players circling the Arch like it’s a bus stop
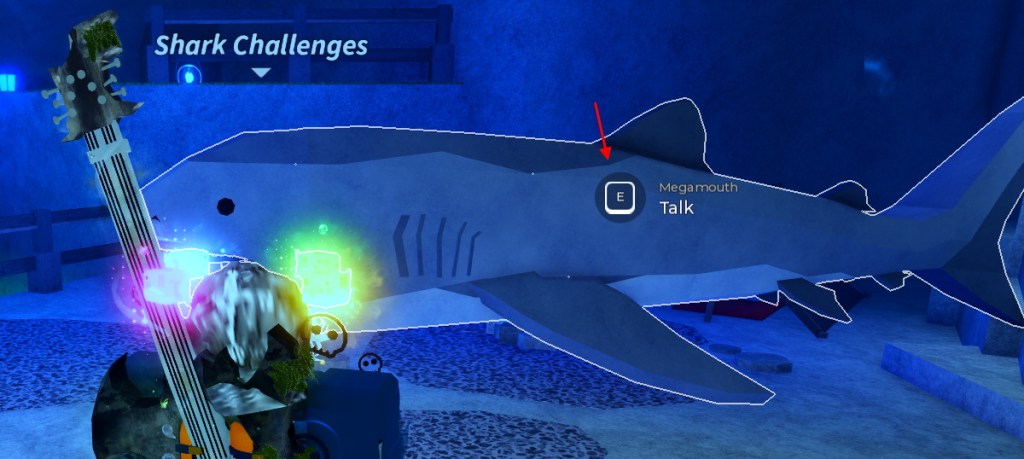
Swim to the Arch in Fisch, then head down and hug the rubble — the Shark Sanctuary hides at the mouth of an underwater cave. If coordinates help you, use your Fisch GPS to go to XYZ: -4038, -1881, -849 and you’ll arrive at the Megamouth/ Sanction area.
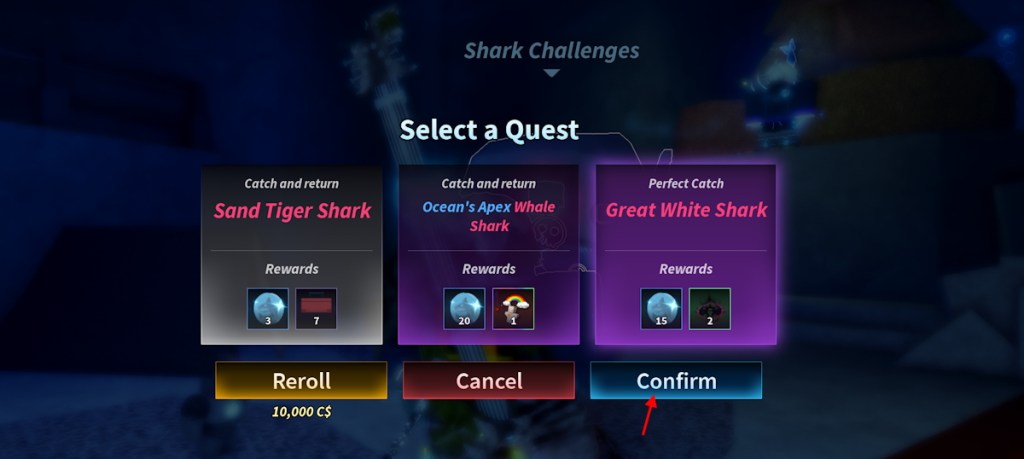
The Megamouth NPC only appears after you finish the first task from the Hammyshork Rod quest. Talk to Megamouth and you’ll open a mission menu with three selectable tasks; each task color signals difficulty: light grey = Easy, blue = Medium, purple = Hard, red = Extreme.
If the menu throws you a mission you don’t want, rerolling is the manual override — it starts at 10,000C$ (≈€10) and doubles each time. I treat rerolls like a calculated gamble: sometimes you pay once, sometimes three times, but the right reward often justifies the cost.
Where can I find the Megamouth NPC in Fisch?
You’ll find Megamouth inside Shark Sanctuary beyond the Arch; swim down to the rubble cave. If you prefer a fast route, tap in the Fisch GPS coordinates above and you’ll land directly in front of the NPC.
Mission patterns: I notice the menu feels like a small vending machine
The options are always shark-catching tasks. Click a task, confirm, and the challenge starts. If you don’t like the pair of rewards shown, you can reroll — the price escalates, so be selective about when you hit confirm.
| Difficulty | Missions |
|---|---|
| Easy | Catch and return 1 (random mutation) Unusual (random shark) Catch and return 1 Mythical (random shark) |
| Medium | Catch 1 (random mutation) Mythical (random shark) |
| Hard | Perfect Catch 1 Mythical (random shark) Catch 1 Apex (random shark) |
| Extreme | Catch and return 1 (random mutation) Apex (random shark) |
Most tasks ask for mutated sharks. If you haven’t farmed mutations yet, I recommend practicing with the Hammyshork Rod runs and testing lures in Fisch zones until your throw timing is consistent. The perfect-catch requirement on Hard missions raises the stakes — it’s not just patience, it’s precision.
Can you reroll Shark Challenge missions in Fisch?
Yes. Reroll cost: 10,000C$ (≈€10) for the first reroll; the price doubles each time. Be strategic: if you’re hunting an Aurora Totem or Companion Candy, a single reroll often pays off; repeated rerolls can burn your credits fast.
Rewards and why they matter: I watch players count tokens like poker chips
Every mission guarantees Shark Tokens plus a second reward that can be rare. The second slot is where the haul lives: totems, relics, baits, whistles, and Companion Candy.
Here’s the short, usable list I collect into my rotation when I’m farming:
- Bait Bucket
- Ancient Shark Whistle
- Shark Whistle
- Bloop Whistle
- Enchant Relic
- Exalted Relic
- Cosmic Relic
- Fish Barrel
- Quality Bait Crate
- Carbon Crate
- Companion Candy
- Aurora Totem
- Rainbow Totem
- Stormbringer Totem
- Empowered Disturbance Catalyst
If you’re after an Aurora Totem or Companion Candy, target Medium-to-Extreme tasks and be ready to reroll once or twice. The system behaves like a slot machine in that rewards feel random, but repeated, targeted attempts tilt probability in your favor — patience plus targeted rerolls is the method I use.
I test runs using Roblox’s own tools and community tips from creators who post on YouTube and Discord; cross-referencing player reports on Moyens I/O and fan forums helps me spot which missions are trending for totems that week.
If you want a short plan: clear the Hammyshork Rod starter task, find Megamouth, choose a Medium-to-Extreme mission depending on your comfort with Perfect Catches, and reroll once if the rewards are weak. The faster you iterate, the sooner you get to the rare drops.
Do you spend credits chasing a single item or spread your rerolls across several runs—which strategy has earned you the best haul?