
Graphics card running hot? Your GPU might need new thermal paste. It’s nothing to be afraid of, and we’ll show you how easy it is to do in this guide.
When and Why Should You Reapply Thermal Paste on Your Graphics Card?

Thermal paste closes the micro-gaps in between the GPU die and the heatsink. As the thermal paste dries out over time, it’ll start to shrink, decreasing the thermal paste’s heat transfer efficiency.
You don’t have to worry about this if your graphics card is less than a year or two old—but if you’re buying used or have a graphics card about three or more years old, repaste’s a good idea.
Repasting will restore performance like it was new again, as it’s not overheating or thermal throttling. Since your graphics card is running at lower temperatures, it’ll also extend its lifespan by a few more years.
Risks of Reapplying Thermal Paste on Your Graphics Card
The chances of you destroying your graphics while repasting are quite low, but there are still risks we want you to be aware of:
- Voiding your warranty: The warranty void sticker usually doesn’t hold up legally, but customer service could easily deny you warranty service if this sticker is broken. Your graphics card probably doesn’t need repasting during the warranty period, though.
- Damaging your graphics card: Accidentally knocking off a capacitor is easier than you think. You will also be exposing the GPU die, which doesn’t have an IHS (integrated heat spreader), unlike a CPU. A small chip or scratch on the GPU die can kill it.
- Worse temperatures: My first attempt was a failure, and I had to add more thermal paste. Thankfully, I did thorough testing to prevent killing my GPU, which we’ll get into below.
I know it sounds risky. But if you follow the steps below, you’ll be fine and could gain some extra FPS along the way.
How to Reapply Thermal Paste on Your Graphics Card
If your graphics card’s performance has started declining and heating up, it might be thermal throttling. This is a sign that it needs repasting and probably some dusting to get it back to its best.
Things You’ll Need
Before we begin, make sure you have everything you need. We don’t suggest opening up your graphics card if you’re missing a few of these.
- Thermal paste
- Screwdriver set (With Torx heads, in case your graphics card uses those)
- Replacement thermal pads
- Plastic pry tool
- 99% isopropyl alcohol
- Cotton balls
- Canned air duster (optional)
- Blower bulb
- Anti-static wrist strap (optional)
- Anti-static mat (optional)
Now you’re prepped and ready to go, it’s reapply the GPU’s thermal paste.
Step 0: Check Your Graphics Card Temperatures

We urge you not to skip this step. Always test and benchmark to see if you’ve improved or worsened your situation.
To perform the test, run Unigine Heaven Benchmark in the background and use a hardware monitor like HWiNFO. Let the benchmark run for 10-15 minutes to ensure you’re reaching your maximum temperatures.
Keep an eye on the GPU temperatures during this time. Ideally, it should stay below 80-85°C, but we suggest you aim lower at around 76-78°C. Repasting should really only be a last resort. Try undervolting your GPU or these GPU overheating solutions first before repasting.
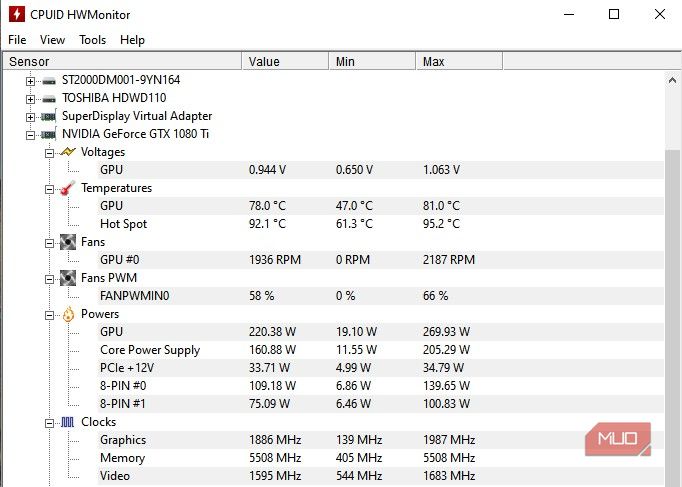
In my case, I’m still getting 78°C after undervolting the 1080 Ti to 0.944V to get lower temperatures. 78°C is a bit high for me, and considering this graphics card was released in 2018 without ever being opened up, a repaste is in order.
Step 1: Remove Your Graphics Card
To remove your graphics card, start by shutting down your PC, turning off your power supply, unplugging the power supply, and then unplugging the cables from your graphics card.
After you unplug your PC, perform a power drain by pressing the power button down for a few seconds to make sure all the power is gone.

Next, open up your case and unscrew the graphics card from the case.

Unplug the power cables from your graphics card.

Finally, to remove your graphics card, press the latch on the PCIe slot your graphics card is plugged into on your motherboard. Gently pull it out.
Step 2: Open Up Your Graphics Card
Graphics cards can differ drastically. Some graphics cards are harder to open up than others, and this EVGA 1080 Ti FTW3 is definitely one of the harder ones out there.
This graphics card has plenty of thermal pads—more than the average. In disassembly, I made sure not to get any dust or dirt on the thermal pads so they could be reused. It’s safer to have replacements just in case you destroy or dirty them, as other crucial components could overheat without them.

Keeping the thermal pads in mind, unscrew your graphics card. We’re starting with the backplates in this case.

Set aside the backplate/s as they have fragile thermal pads.
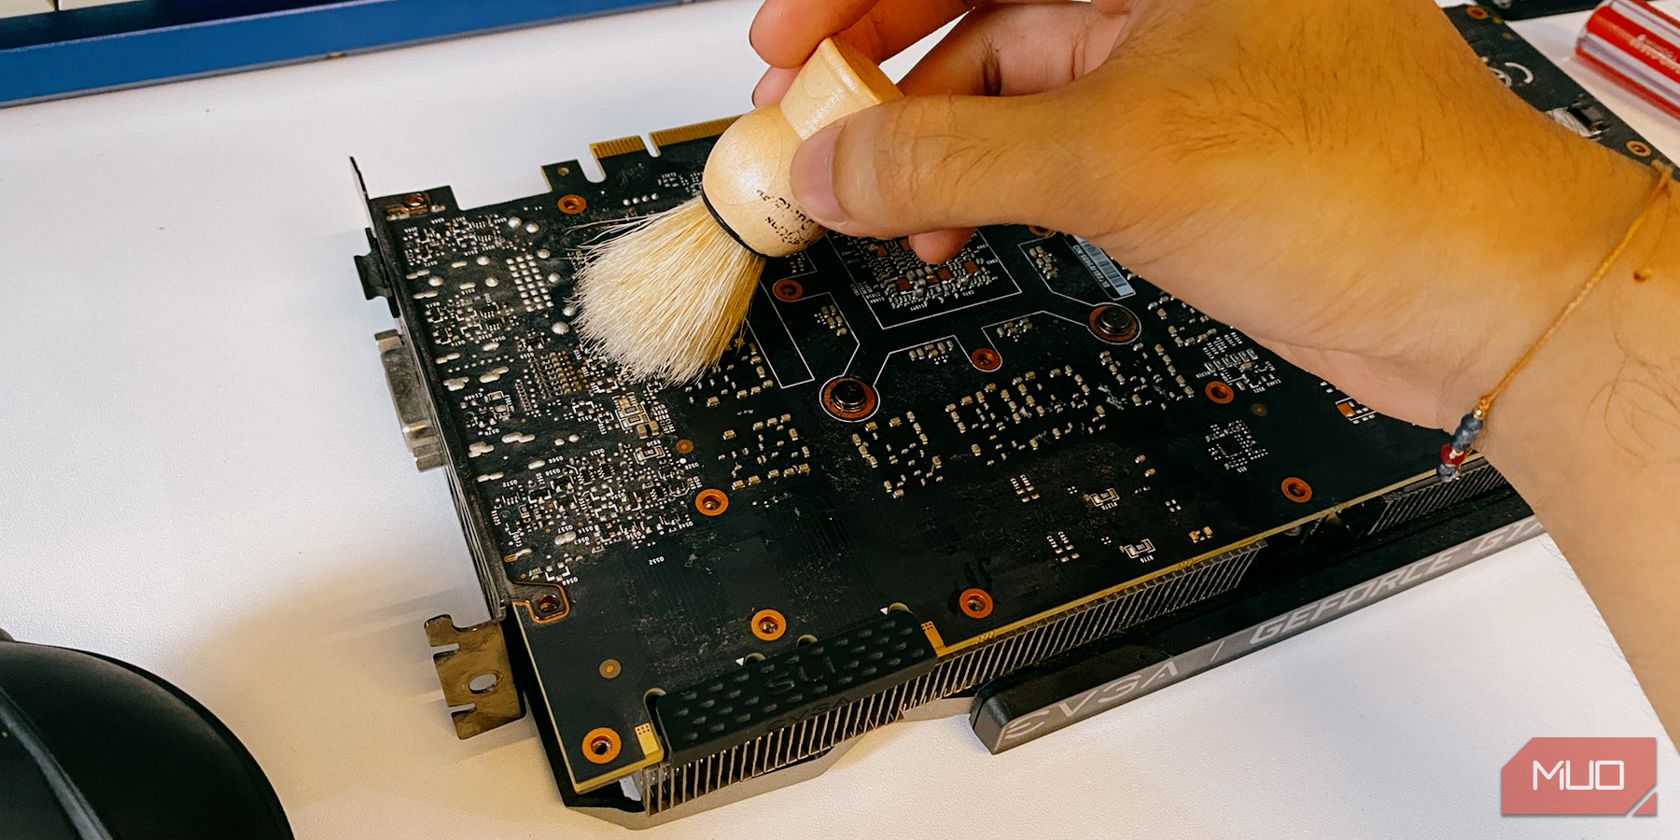
We’ll also take this opportunity to brush off any dust and dirt off of the back to improve thermals.

Next, we’ll unscrew the sprung screws pressing the GPU cooler to the GPU chip on the mainboard.

Before you take the cooler off, make sure that you’ve unplugged the various power connectors and unscrew the IO bracket if needed.

Once everything is out of the way, gently peel off the cooler, keeping in mind the thermal pads that may be underneath.
Step 3: Remove Old Thermal Paste
Once your graphics card is open, it’s time to remove the thermal paste attached to the cooler and the GPU die.
Starting with the GPU die, make sure not to use any scraping tools, especially ones made out of metal. If you chip even just the corner of the die, you might kill it. Use 99% isopropyl alcohol and let the thermal paste soak in it for a few seconds, then rub it off with a cotton ball or swab. You don’t need to remove the spillover; cleaning the surface will be enough.

Next, on the cooler, do the same thing, letting the alcohol soak and then rubbing it off.
Step 4: Add New Thermal Paste
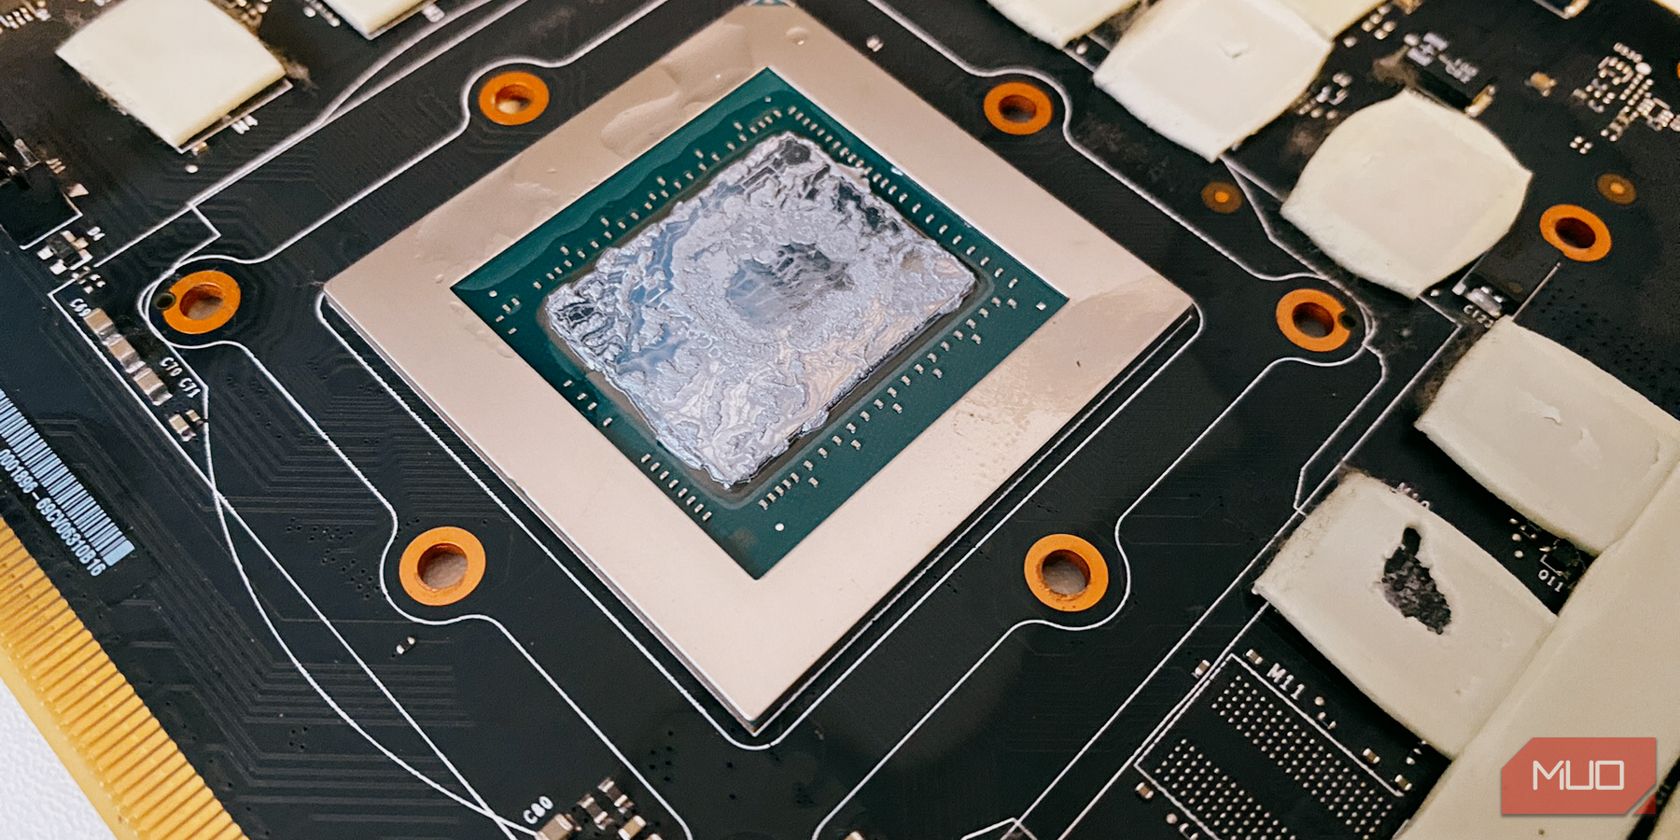
Less is not more when it comes to your GPU die. Unlike a CPU, the cooler is directly on the die and not an IHS, as previously mentioned.

Apply a decently large amount of thermal paste onto the chip, definitely more than in the image above. Preferably an X mark, but a large dot will also work. Apply more than you think, but not too much. Don’t worry about the spillover too much, as the thermal paste isn’t conductive (but, you know, don’t go wild!).

Next, and most importantly, is to spread it out and reach the edges of the GPU die. Make sure the edges have a decent coating and are not thinned out.
Step 5: Reassemble Your Graphics Card
Once you’ve applied the thermal paste, you can reassemble your graphics card.
Just in case you’ve messed up some thermal pads, now is the perfect time to replace them. If they’re intact, proceed to attach the cooler and screw on the sprung screws at the back of the mainboard, just behind the GPU chip. Tighten in a cross pattern to ensure even coverage.
Proceed to reassemble by plugging in the power connectors from the cooler to the mainboard, attaching the IO bracket, and placing on the backplates if your graphics card has any.
Step 6: Test and Compare Your Temperatures
Finally, a very important step to make sure your work is really done and doesn’t need redoing is testing.
Just like we showed in Step 0, run the same benchmark for about 10-15 minutes with a GPU temperature monitoring software. In my case, I’m also checking EVGA’s Precision X1 software since the FTW3 has iCX technology. It tells me the temperatures of the other components, like the ones under the thermal pads, to know if I need to replace those as well.
After my first test, I noticed the GPU ran up to 90°C while the other components weren’t as hot. Opening up the graphics card, I noticed that while it did spread out and coat evenly as intended, it thinned out and had gaps.
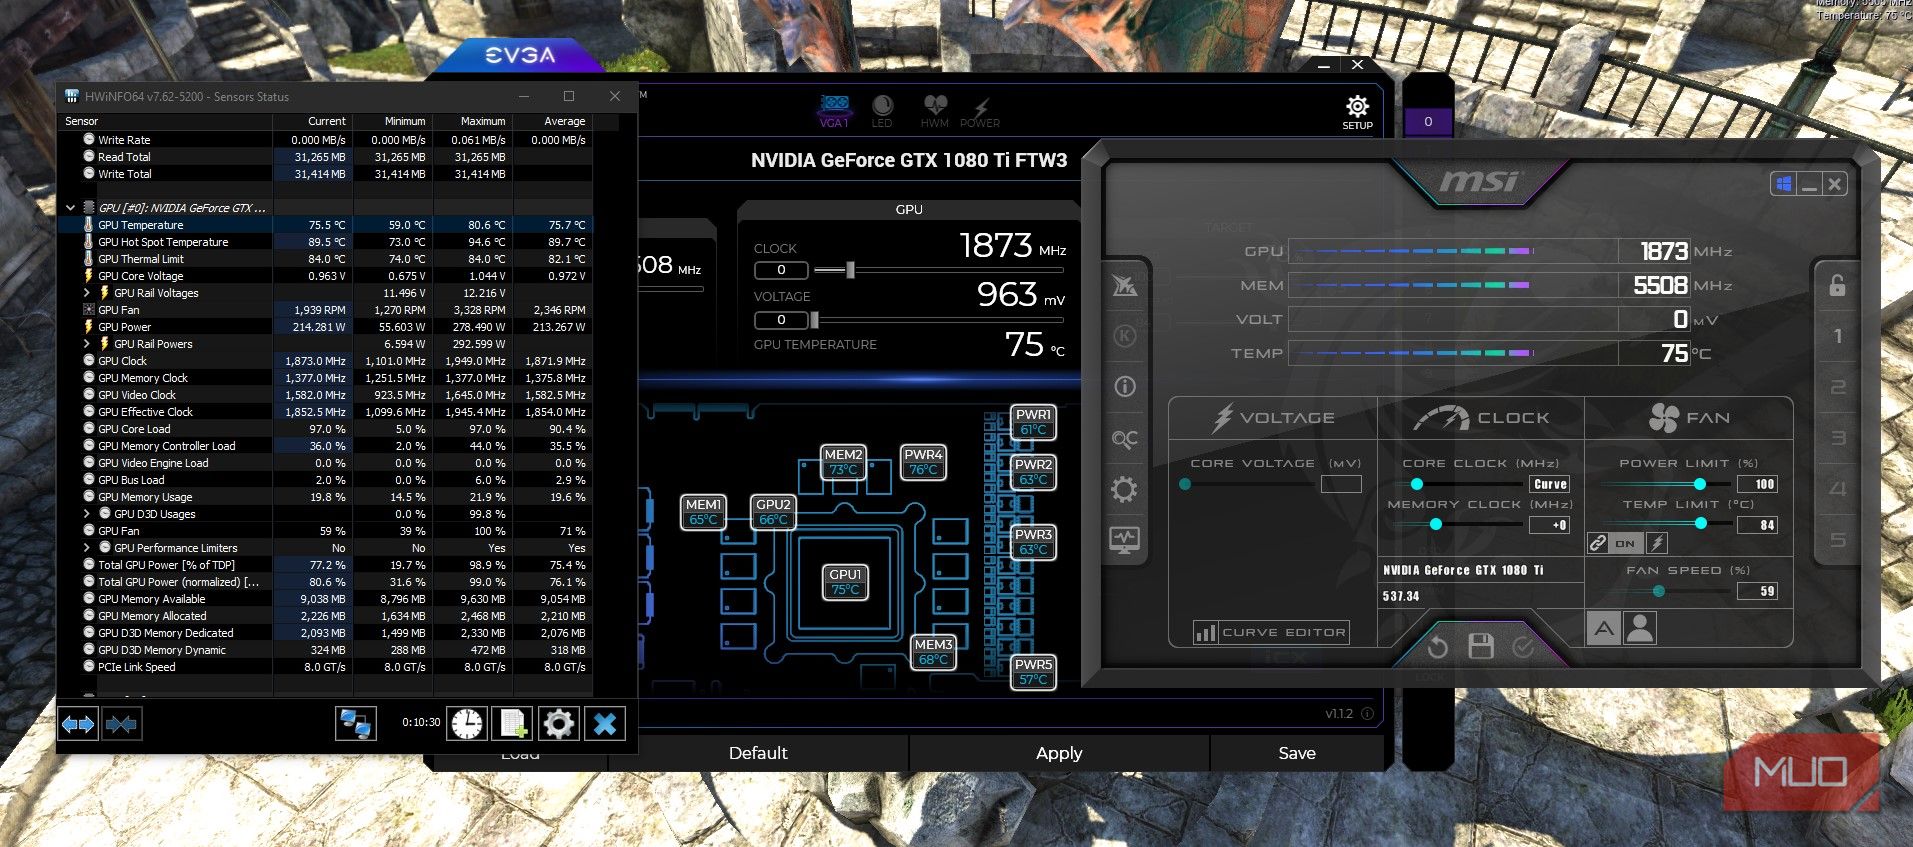
After adding more thermal paste, I tested for 10 minutes at a slightly increased voltage, as I noticed some instability at 0.944v. Despite the increased voltage, my temperatures averaged about 75.7°C.
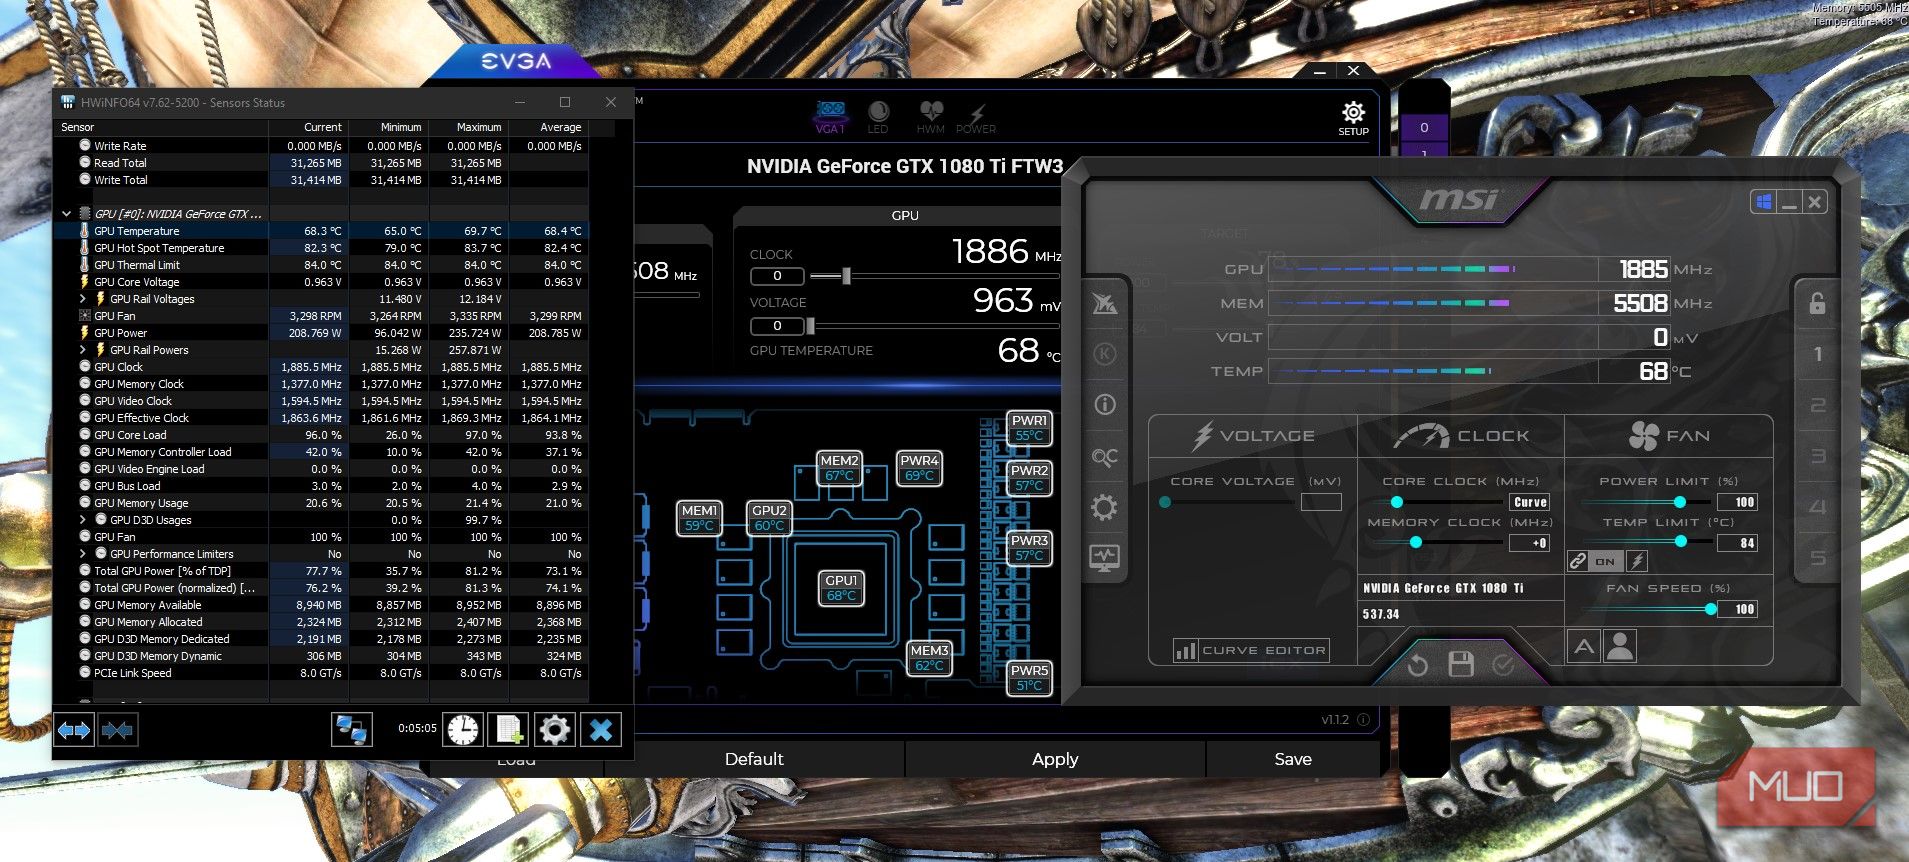
I wanted to see how low I could get, so I tried using 100% fan speed instead of auto, and it stopped increasing at around 68.4°C after maxing out at 69.7°C after just five minutes. You could also set a custom fan curve to ramp up to 100% fan speed at around 70°C to get the lowest temperatures at peak performance. It will be quite loud, though.
Increase Performance and Extend the Life of Your Graphics Card With New Thermal Paste
Repasting is one of the most impactful things you can do to an old graphics card, not just for its performance but for its age as well. Graphics cards can even last up to 10 or more years with regular maintenance. We hope this guide has helped you get cooler temperatures and regain lost performance from your graphics card.