I dropped out of the Battle Bus with the island already a ring of distant thunder. You can hear gunfire skitter and the Dark Harvester’s shadow pass over Lethal Labs. In that window I realized the match would force a decision: fly up, or miss the story.
Where to find a Zero Point Shard in Fortnite
I landed in Lethal Labs three matches in a row and the shard showed up in the same place every time.
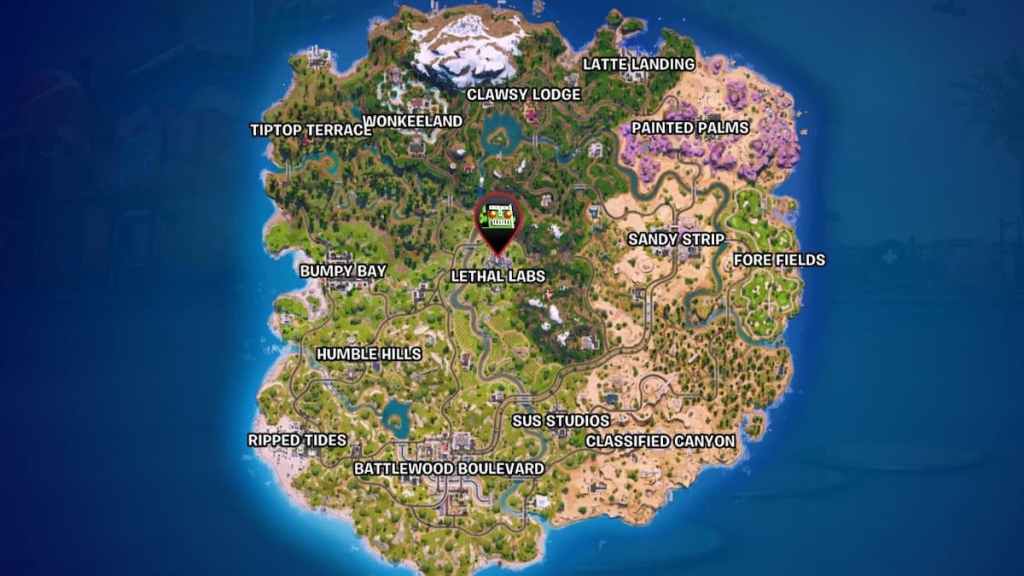
The Zero Point Shard sits in the very center of the Lethal Labs POI, which occupies the island’s middle. You won’t need to tunnel through floors or solve a puzzle — it’s exposed on the surface beneath the Dark Harvester spaceship owned by the Dark Voyager. It hangs in the air like a jewel caught in a spiderweb, split into two pieces with a dull grey shell and bright pink crystals spilling out, and a faint rainbow effect that makes it impossible to miss once you’re nearby.

Where is the Zero Point Shard located in Chapter 7, Season 1?
Center of the island, inside the Lethal Labs POI under the Dark Harvester. If you open the map and mark the facility in the island’s middle, head there early in the match and you’ll spot the shard hovering under the ship’s belly.
Touch a Zero Point Shard to investigate its mysterious effects in Fortnite
I checked the quest text and it simply said, “Touch a Zero Point Shard” — no coordinates, no hints, just an invitation you have to accept in midair.
The technical requirement is straightforward: you must interact with the shard once by physically colliding with it. Because it’s suspended high under the Dark Harvester, interacting means you have to reach altitude and fly into the shard. Touching it feels like flipping a hidden switch in the island’s spine, and the game will immediately mark the objective.

How do I touch the Zero Point Shard?
Start from the Battle Bus and commit: jump early, aim straight for Lethal Labs, and fly through the shard before other players contest the area. That’s the simplest, most reliable method if you want the objective checked off fast.
If you miss the early jump, use an elevation tool. A Wingsuit lets you climb to a nearby roof, then glide up and weave over the shard to clip it. Launch Pads and Shockwave Grenades can fling you upward, but they demand precision and timing — Shockwaves can overshoot or shove you into the Dark Voyager’s hull if you’re careless. If you have a teammate, ask them to boost you with a Shockwave or Launch Pad to reduce risk.
What items help you reach the shard safely?
Wingsuit is the cleanest option; it gives control while you aim under the ship. Shockwave Grenades and Launch Pads work in a pinch but require practiced timing. Avoid colliding with the Dark Voyager ship — a bounce against metal will ruin the attempt.
Can you complete this quest solo?
Yes. You can clear the objective alone so long as you commit early or bring the right tools. Solo runs reward independence, but teammates make the climb forgiving and reduce firefights while you ascend.
Finish this early in the match — if the storm closes over Lethal Labs you’ll spend more time surviving than touching crystals. You want the shard ticked off before the circle starts to punish altitude attempts, and you want to scope for players who treat the shard as bait.
So: will you rush the shard out of the Battle Bus and steal that moment of discovery, or will you wait for backup and risk missing the scene entirely?
