
Exciting times are ahead for Minecraft players as the family of copper blocks is set to receive an upgrade with brand new armor and tools. While these features are slated for a future update, you can start testing them right away. Copper tools and armor offer a fantastic alternative for those early-game crafters struggling to find iron ores with just a stone pickaxe. They outperform leather and stone options, making them a valuable asset on your Minecraft journey. This guide will walk you through the steps to craft copper tools and armor, making your gameplay smoother and more enjoyable.
Essential Items for Crafting Copper Tools in Minecraft
Crafting copper tools and armor closely resembles the process of creating items from iron. You will need the following:
- Copper Ingots: Obtainable by smelting copper ores in a furnace using a fuel source.
- Sticks: Create with two wooden planks or two pieces of bamboo.
- Crafting Table: Essential for combining these materials into the desired items.
How to Craft Copper Armor in Minecraft
| Armor Piece | Armor Points | Durability | Crafting Recipe |
|---|---|---|---|
| Copper Helmet | 1 | 121 | 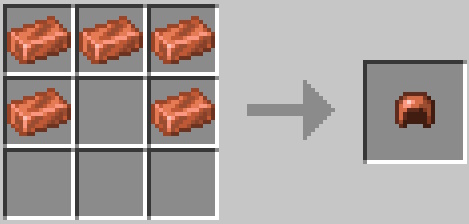 |
| Copper Chestplate | 2 | 176 | 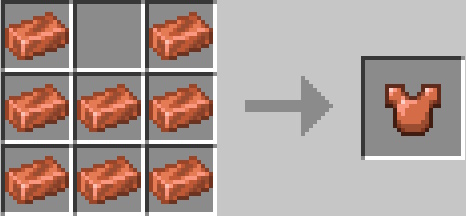 |
| Copper Leggings | 1.5 | 165 | 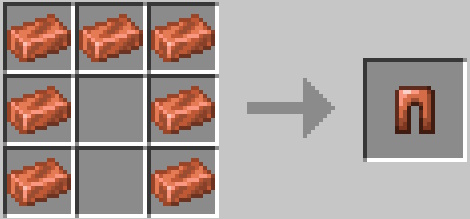 |
| Copper Boots | 0.5 | 143 | 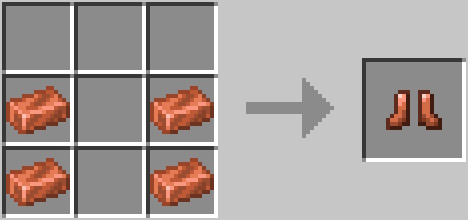 |
Copper Helmet
To craft the copper helmet, you’ll need 5 copper ingots. In your crafting table, fill the top row with three ingots, place one ingot in the left cell, and one in the right cell of the middle row. Wearing this helmet grants an additional armor point.
Copper Chestplate
The chestplate requires 8 copper ingots. On the crafting table, fill every cell except for the middle cell in the first row to create the chestplate, which boosts your armor points by 2.
Copper Leggings
For the leggings, you’ll need 7 copper ingots. Fill all the crafting table cells except the middle ones on the second and third rows to obtain the copper leggings, enhancing your armor points by 1.5.
Copper Boots
Lastly, for the copper boots, use 4 copper ingots. Place two boots in the left and right slots of the second and third rows. Once crafted, these boots contribute 0.5 armor points.
Crafting Copper Tools in Minecraft
| Tools | Damage (Hearts) | Durability | Crafting Recipe |
|---|---|---|---|
| Copper Hoe | 2/0.5 | 191 | 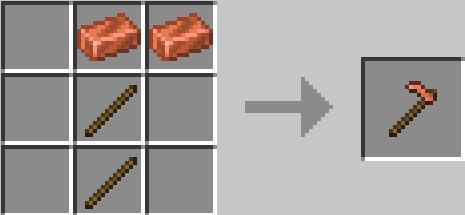 |
| Copper Shovel | 1.5/1 | 191 | 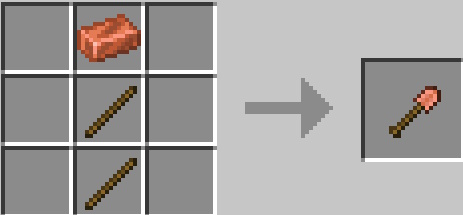 |
| Copper Pickaxe | 2/1.5 | 191 | 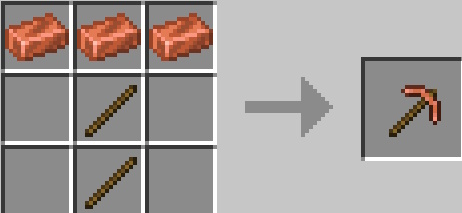 |
| Copper Axe | 2.5/4.5 | 191 | 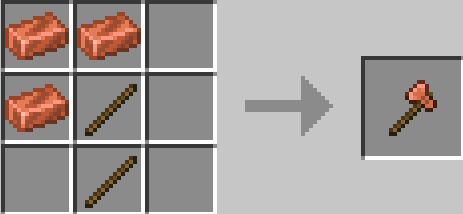 |
| Copper Sword | 3/2.5 | 191 | 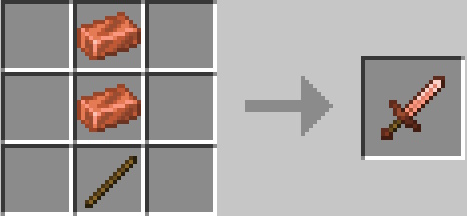 |
Copper Hoe
The copper hoe requires two copper ingots and two sticks. Place the sticks in the middle cells of the second and third rows, and the ingots in the first row. This tool is essential for your farming needs.
Copper Shovel
The copper shovel is an economical choice, needing only one copper ingot and two sticks. Arrange them similarly to the hoe, and it’s ready to help you dig dirt and sand.
Copper Pickaxe
To craft the copper pickaxe, fill the top row with three copper ingots and place sticks in the center cells of the second and third rows. This handy tool accelerates your mining efforts.
Copper Axe
The copper axe requires three copper ingots and two sticks. Arrange them in a triangular pattern across the crafting table for an effective tool to gather wood.
Copper Sword
Lastly, to create the copper sword, you’ll need two copper ingots and one stick. Position the ingots in the first two rows’ middle cells and the stick centrally in the third row to yield this powerful weapon.
Now that you have the inside scoop on crafting all the copper tools and armor in Minecraft, it’s your turn to dive in and start using them. Which ones are you most excited to try? For more tips and guides, feel free to explore related content at Moyens I/O.