
I remember the server quieting as a timestop snapped the air—my gunshot froze mid-flight and a stranger’s health bar blinked to zero. You feel that pinch in your gut when a single stand decision folds a match into dust. I’ll spare you fluff: what follows is the tier map I’ve used to win, lose, and learn.
Bridger Western Best Stand Ranked
On any populated server a single perfect timestop can change the scoreboard before anyone types “gg.”
I’ve spent dozens of hours testing stands in clutch moments so you don’t have to wonder which ones carry you through a chaotic duel. Below is a clean breakdown of power potential and flexibility—expect skill, aim, and map sense to swing results, but some stands are simply built to dominate.
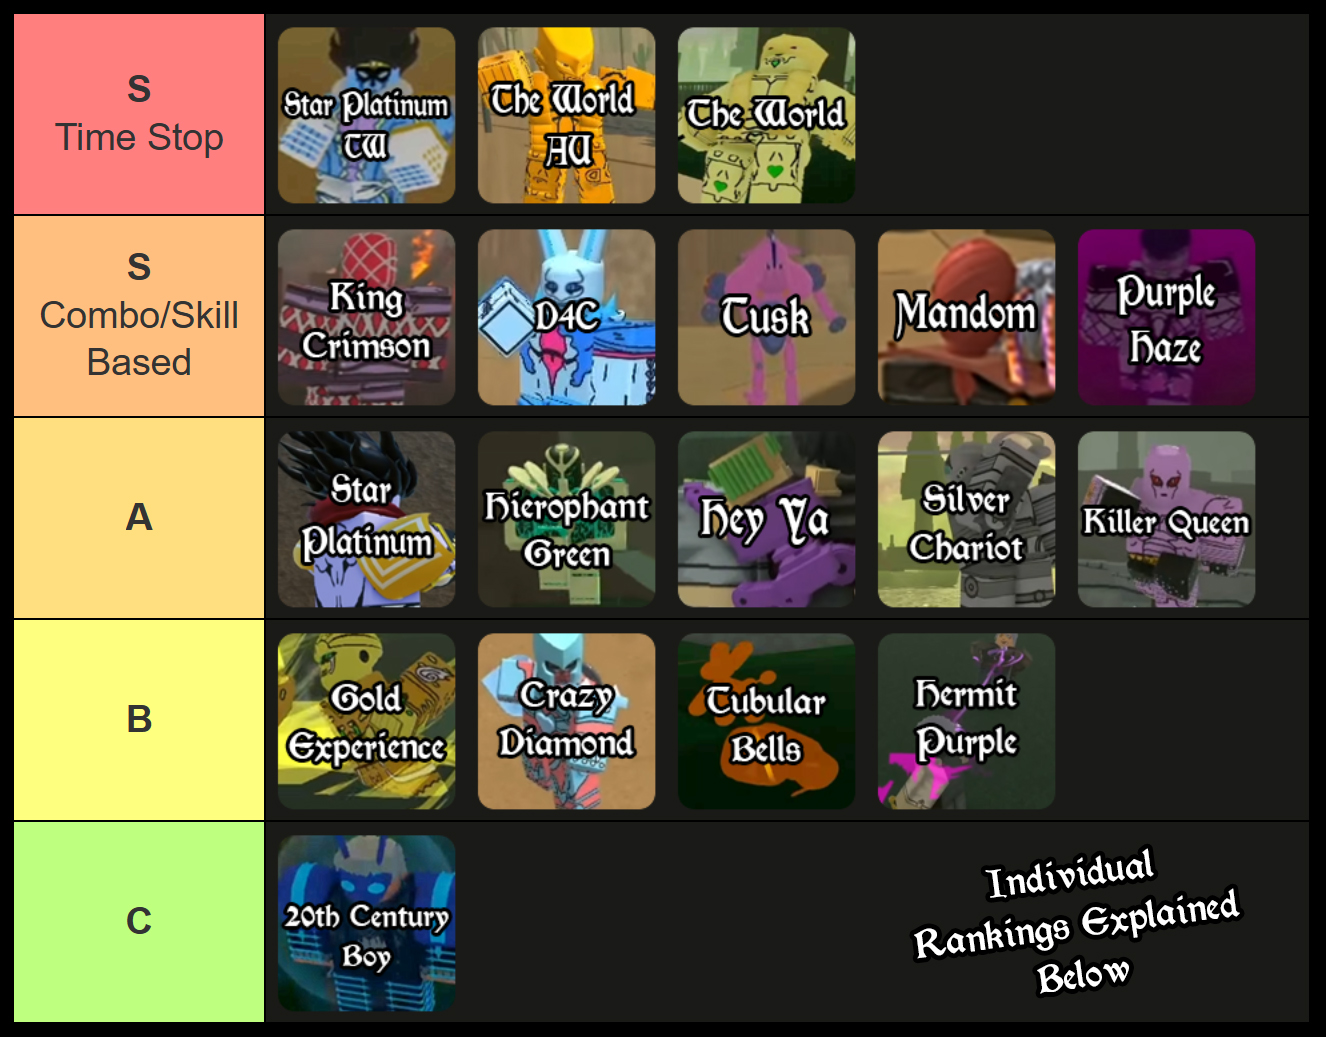
Quick bracket: Time Stop stands sit at the top for a reason, but high-skill combo stands can outplay them in the hands of a practiced player. Below I split the S-Tier into Time Stop and Combo/Skill-based so you know who’s inherently dominant and who rewards practice.
- S-Tier Time Stops vs S-Tier Combo/Skill-Based: Time Stops win raw control; combo stands win clutch outplays.
- A-Tier: Powerful but more setup or skill-dependent.
- B-Tier: Situational specialists—very strong in the right hands or maps.
- C/D-Tier: Low ceiling or niche utility.
S-Tier Stands (Time Stop)
| S-Tier Stands | Ranking Notes |
|---|---|
 Star Platinum – The World Star Platinum – The World |
I prefer SPTW’s timestop for the faster windup; The World works too but has longer startup and slightly wider radius. Either way, time stop crowns games quickly; learn the timing and you convert stalled fights into kills. |
  The World (Base & AU) The World (Base & AU) |
TW and TWAU trade minor differences—one has a teleport, the other some auto-track options—but both share the same game-breaking core: freeze time and force a kill. Beware the windup; predictable players will bait you. |
S-Tier Stands (Combo/Skill-Based)
| A-Tier Stands | Ranking Notes |
|---|---|
 King Crimson King Crimson |
Time Erasure is the best counter to timestops. King Crimson pairs defense and mobility with strong burst—learn the timing and you’ll bait timestops and punish the pause window. |
 D4C D4C |
Dimension Hop gives damage negation and clones for mobility. Excellent for defensive play and escaping burst; the swap trick is powerful but predictable if abused. Obtainment: 100 Kills, 10 KS, spawn in the Desert; corpse mechanics apply. |
 Tusk Tusk |
High skill reward: slow stamina and movement but massive range and nail spam in Tusk 2. Use Glide and Jump to bait and snipe from range. Obtainment: small chance from Left Arm corpse part. |
 Mandom Mandom |
Mandom is the best passive PvP stand—time rewind costs no stamina and can reverse a burst. With tight timing you turn low HP into a comeback. Use it with a reliable rifle for maximum safety. |
 Purple Haze Purple Haze |
Poison clouds shred non-stand players and force stall fights. Positioning and Stand Pilot are mandatory—your own toxin will bite you if you’re careless. |
A-Tier Stands
On maps with tight corridors, A-Tier stands can feel like an automatic advantage.
| B-Tier Stands | Ranking Notes |
|---|---|
 Star Platinum Star Platinum |
Strong barrage and finisher, and it can evolve into SPTW. Solid pick if you want raw damage without time stop in the base form. |
 Hierophant Green Hierophant Green |
20-meter wires excel against inexperienced players; skilled opponents punish once they recognize the setup. Great off-angle play but predictable if telegraphed. |
 Hey Ya Hey Ya |
Free stamina use and random buffs make this low-skill-floor stand surprisingly consistent. You can’t control the buffs, but they can turn trades in your favor without practice. |
 Silver Chariot Silver Chariot |
Combo-heavy one-shot potential, but a single missed link hands momentum back to your opponent. Master the strings and you’ll kill fast; miss them and you die just as quick. |
 Killer Queen Killer Queen |
High-pressure close-range tool. If you can consistently force low-distance fights, QB hits hard; if you get zoned, you’ll struggle. |
B-Tier Stands
On open fields, B-Tier stands trade safety for special tools.
| C-Tier Stands | Ranking Notes |
|---|---|
 Gold Experience Gold Experience |
Great in group fights: heals and damage make you a team asset. Solo duels are riskier because healing invites aggression. |
 Crazy Diamond Crazy Diamond |
Burst potential at close range but suffers from zoning. Heals are weaker than Gold Experience, which eats a slot that could boost flexibility. |
 Hermit Purple Hermit Purple |
No stamina cost and a solid grapple make this an easy utility pick. Low ceiling but reliable with very little downside. |
 Tubular Bells Tubular Bells |
Huge damage with auto-aim balloons if you can set them up safely. Vulnerable to rushes before your traps deploy. |
C-Tier Stands
In most standard matches, these stands offer gimmicks more than wins.
| D-Tier Stands | Ranking Notes |
|---|---|
 20th Century Boy 20th Century Boy |
Low power potential and easily countered moves. Fun as a novelty, weak in ranked duels. |
How to Get and Reroll Stands in Bridger Western
On most maps you’ll see corpse parts or small yellow beams—those are the stand seeds players fight over.
You obtain stands two main ways. Hold a Corpse Part until it merges with you, or fish for Stand Arrow Shards. I prefer the corpse method when servers are crowded; it’s riskier but faster.
- Method #1 – Corpse Parts: Corpse Parts spawn when at least three players are in a server; spawn chance scales with player count (up to 25 players). They flash with a loud sound and a yellow beam—pick one up and protect it until it absorbs. If you die while holding it, you lose the opportunity.
- Method #2 – Stand Arrow Shards: Arrow Shards drop from fishing at a 0.5% chance. Buy a fishing rod and bait for 150 moola (~€1) at the Tackle Bait/Fishing Goods NPC. Arrow Shards disappear if you die or leave—use them immediately.
- Quest Stands: Some stands like D4C require quest conditions (see D4C notes above) and cannot be obtained via standard spawns.
- Rerolling: Visit the Mud Witch’s Hut in the Swamp and trade a Dogbane Herb for a stand wipe. Dogbane drops from chests (about 4% chance) and can also be sold to the Witch for 2500 Moola (~€17) or used to reduce age.
How to Reroll Stands in Bridger Western?
You go to the Mud Witch’s Hut in the Swamp with a Dogbane Herb and ask for a Path wipe. Dogbane drops from event chests at roughly 4% and can be rare; I keep one when I’m chasing a specific stand.
How to use Dogbane Herb in Bridger Western?
Bring the Dogbane Herb to the Mud Witch. You can exchange it for 2500 Moola (~€17), a stand wipe, or reduce your age by 20 years. Choose based on whether you need currency, a fresh reroll, or to avoid age penalties.
Two practical notes: I track my favorite stands on the community Trello and cross-check builds on the Bridger Western Wiki; Moyens I/O’s image guides are handy for quick reference. If you want to learn a stand, practice in spawn for several matches—comfort beats theory in tight fights.
Time stops land like a slammed jail door and Mandom feels like a safety net woven from stolen seconds—both metaphors for why small decisions become match-winning plays.
Want the full set of links, drop locations, and a short video of each stand’s ideal combo? The community Trello and Wiki are already curated—will you test a timestop or master a combo stand first?