Artificial Intelligence is evolving rapidly, and after we became accustomed to AI chatbots, action-oriented AI agents are stepping into the spotlight, revolutionizing how we boost productivity. But hold on! It’s one thing to use these amazing AI agents; it’s another to create one that fits perfectly into your personal workflow. Let’s dive into a step-by-step tutorial where I’ll show you how to develop your very own AI agents using OpenAI’s Agent Builder—an intuitive, visual platform to create dynamic multi-agent systems. Ready? Let’s go!
Set Up OpenAI Agent Builder
Creating an AI agent might sound like a technical challenge, but trust me, with OpenAI’s Agent Builder, you can easily bring your ideas to life through a visual interface. Here’s how you can kick off your journey.
- To start, create a free account at platform.openai.com and log in.
- You’ll need to add at least $5 to your account; this gives you the budget to build and test your AI agent.
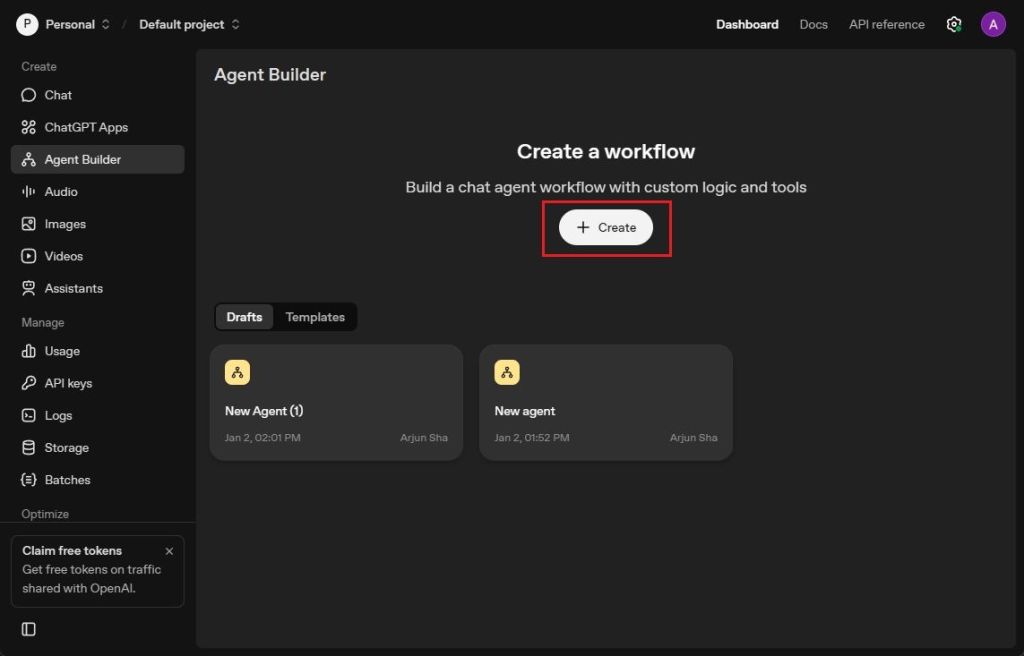
- Once you’ve logged in, navigate to platform.openai.com/agent-builder and click on “Create”.
- Behold, a visual canvas awaits you, ready to be filled with your ideas for a multi-agent workflow.
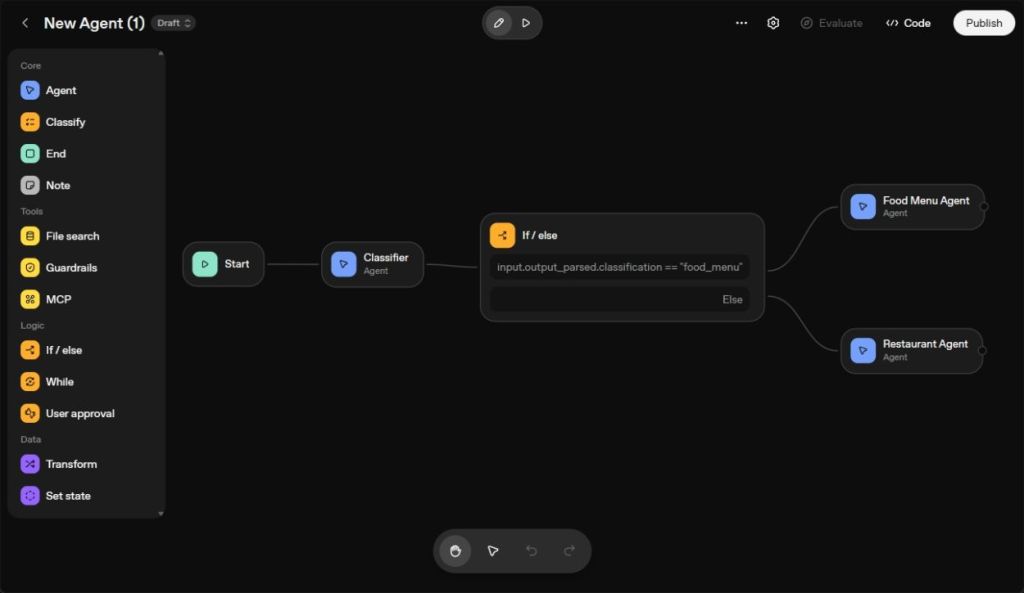
Create Your First AI Agent with OpenAI Agent Builder
- Imagine you’re creating an AI agent to help people find menus or the top restaurants in a specific area. Click on “My agent” to get started.
- Name your agent “Classifier” and set it up to categorize user queries as either food menu requests or restaurant searches.
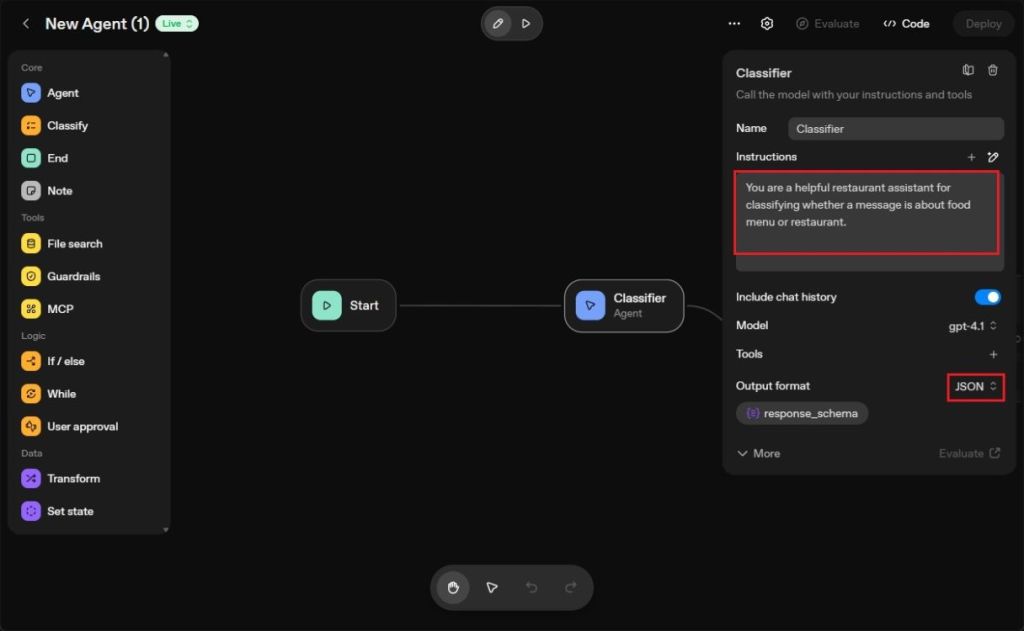
- Change the Output format to JSON, and remember I’m using the GPT-4.1 model for this.
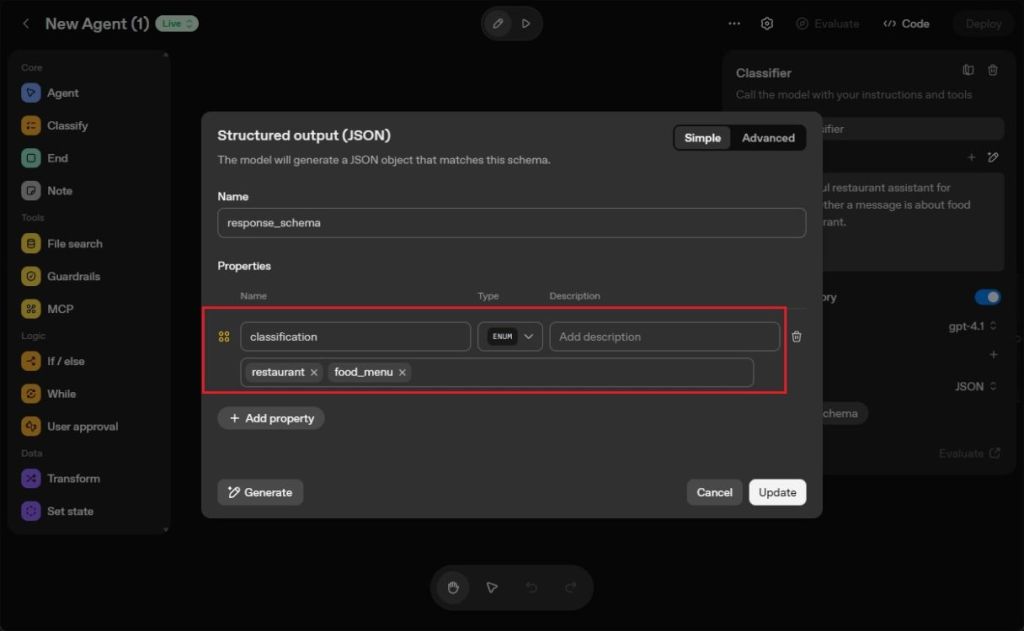
- Add a classification property with ENUM data type and include the values
restaurantandfood_menu.
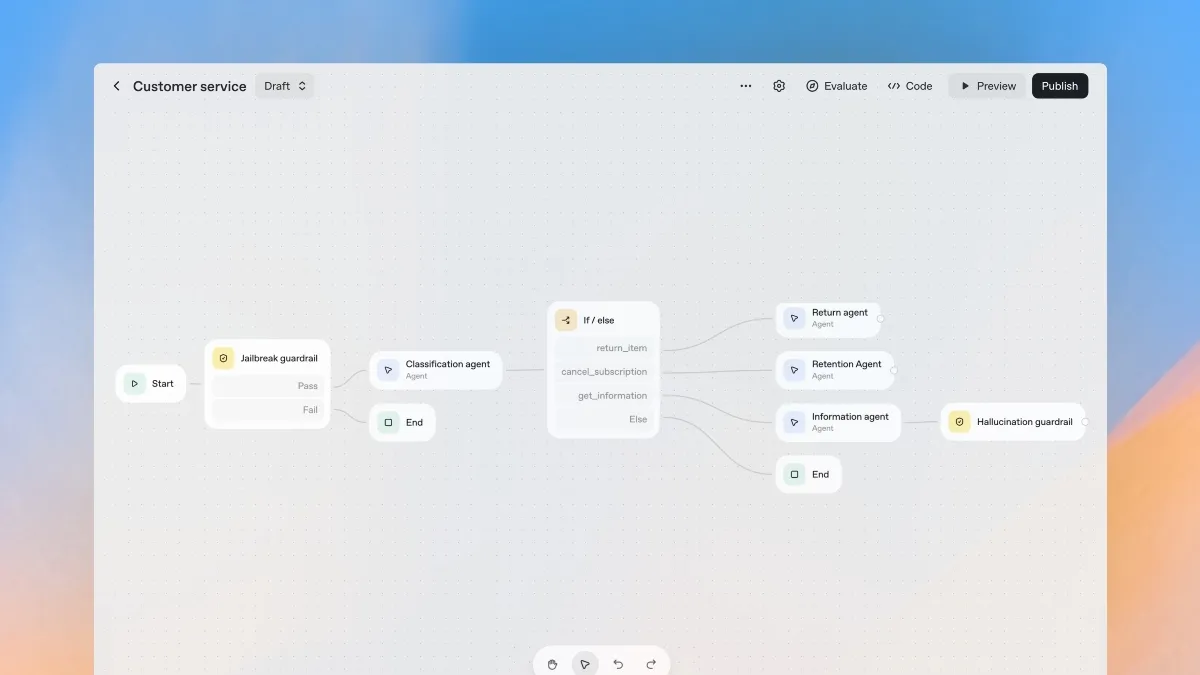
- Visualize the Classifier AI agent, and then create an “If/else” node. Select it from the left sidebar.

- Click on the conditional node, then define the result of the classifier.
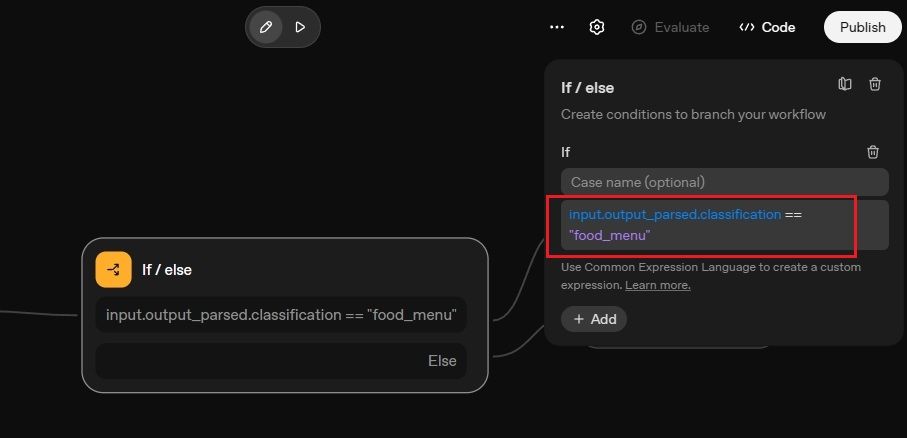
- For instance, if the intent is “food_menu”, it proceeds to the Food Menu Agent. If not, it routes to the Restaurant Agent.
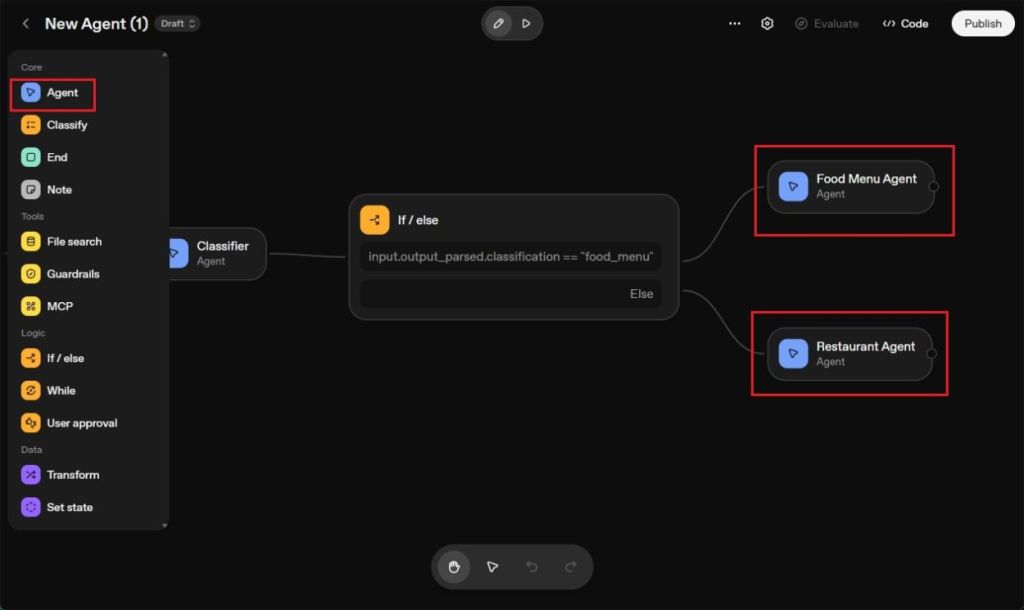
- Extend the node again from the “If/else” node and create a new AI agent from the left sidebar.
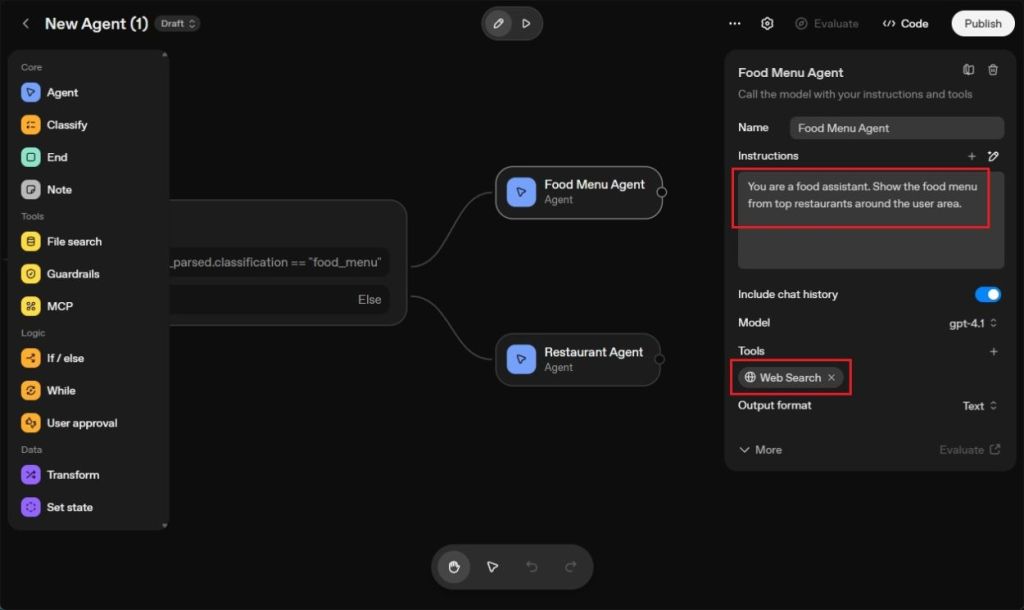
- This new AI agent will search for food menus from the top restaurants in your area.
- Plus, I’ve added the “Web Search” tool to enable this AI agent to pull in fresh information from the internet.
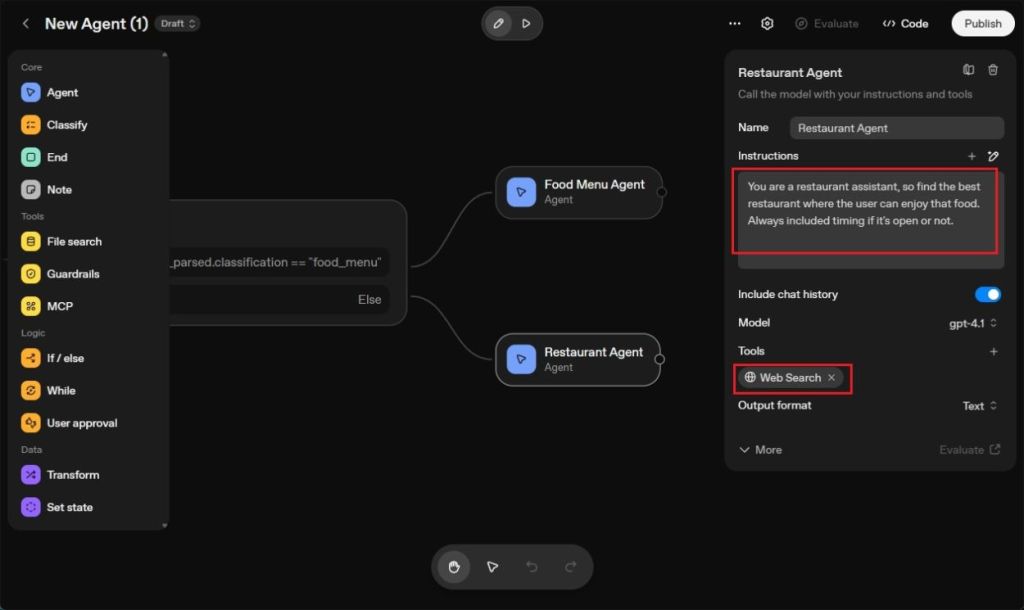
- In another Else node, create a Restaurant Agent to find the best places for the food, including their hours of operation. Again, allow Web Search access.
- And voilà! Your multi-agent setup is complete. Here’s how my first AI agent turned out.
Test and Publish the AI Agent
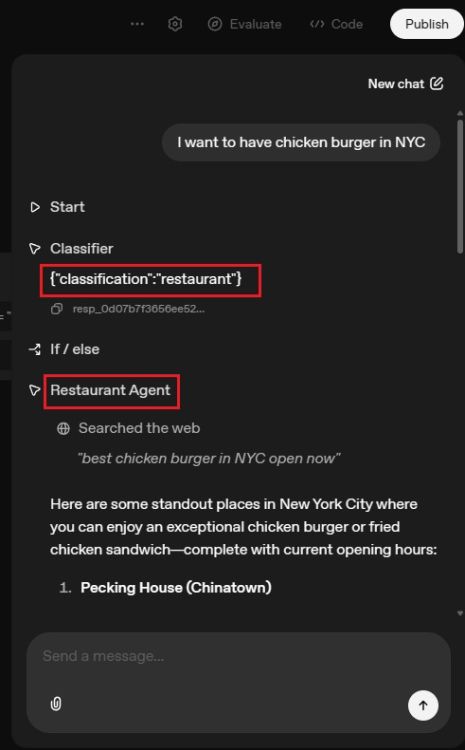
- Time to bring your creation to life! Click the “Play” button, and a chatbot interface will pop up.
- Type in a request like “I want to have a chicken burger in NYC”, and watch the Classifier agent spring into action.
- It identifies your intent is restaurant-related, activating the Restaurant agent. You’ll get a list of top places to enjoy that chicken burger in the city.
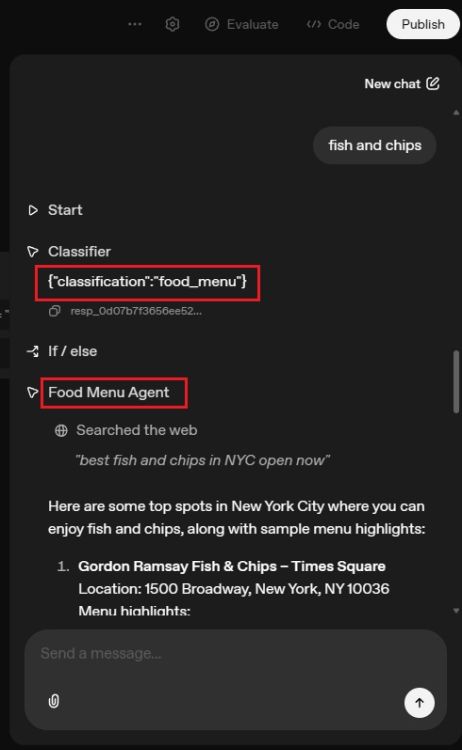
- Next, try typing “fish and chips.” The Classifier agent recognizes you’re asking for the menu.
- This prompts the activation of the Food Menu Agent, delivering detailed menus from top places where you can enjoy fish and chips in New York City.
- As you can see, the multi-agent workflow operates seamlessly, showcasing the collaborative functionality of three AI agents.
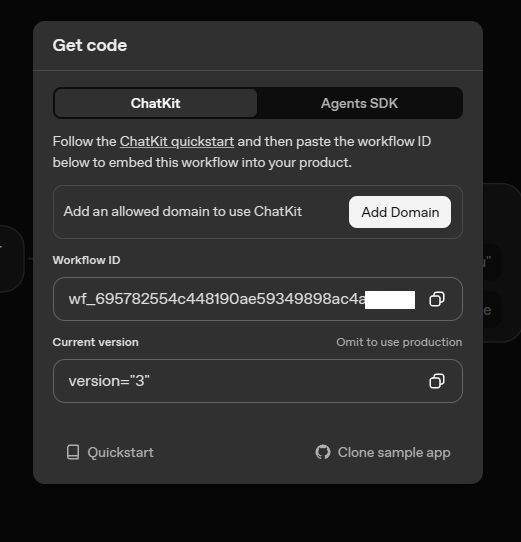
- Click the “Publish” button to integrate the AI agent into your app or website.
- Using OpenAI’s ChatKit simplifies the integration of your AI agent, and you can find a template here. For an alternative, consider OpenAI’s Agents SDK.
And there you have it! You’ve successfully created an AI agent using a visual canvas, thanks to OpenAI’s Agent Builder. The possibilities are endless with the nodes you can create, leading to a sophisticated multi-agent AI system. If you want to dig deeper or if you have questions, feel free to share in the comments below!
What are the steps in creating an AI agent?
To create an AI agent, you typically need to sign up on a platform, define your agent’s purpose, set up its classifications, add conditional logic, and finally test and publish the agent.
Can beginners create AI agents?
Yes, with tools like OpenAI’s Agent Builder, even beginners can create AI agents using a simple visual interface without needing extensive technical knowledge.
How does the classification process work in AI agents?
Classification in AI agents involves defining categories or intents that the agent can recognize. Based on user input, the agent processes queries and routes them to the appropriate responses or actions.
What tools can help in building an AI agent?
Platforms like OpenAI’s Agent Builder provide a robust set of tools for building AI agents, including visual canvases and web search capabilities for real-time data.
How can I integrate my AI agent into my app or website?
You can integrate your AI agent using OpenAI’s ChatKit or their Agents SDK, which offer templates and detailed guidance for seamless implementation.