
Key Takeaways
- Print a test page to troubleshoot printer issues. Make sure to check ink levels and alignment.
- Restart your printer and PC to resolve blank page printing problems.
- Ensure ink cartridges are installed correctly and unclog print heads for better printing quality.
If your printer is printing blank pages all of a sudden, the problem might not be immediately apparent. But there are a few fixes and workarounds you can try to stop your Canon, Brother, Epson, or HP printer from printing blank pages—or any other printer, for that matter.
1. Print a Test Page
To check whether the problem is with your printer, run a test print. This can help you isolate the underlying issue. Maybe the print heads are not aligned, or there is inconsistent ink flow. Printing a test page can help you find out.
Here’s how to print a test page on Windows:
- In the Windows Start menu, navigate to the Control Panel app.
- Click on the Devices and Printers option.
- Right-click on your printer and select Printer properties.
- Under the General tab, click on the Print Test Page button.
Follow these steps to print a test page on Mac:
- Click on the Apple menu on the top left of the screen.
- Select System Settings.
- Click on Printers & Scanners.
- Under your printer, click on the options button.
- Click on the option Print Test Page under the Utility tab.
It might be that your printer is printing blank pages because it is low on ink—or out of it altogether—or because its print heads are wonky. The test page should confirm this.
2. Restart Your Printer and PC
Many times, a simple reset can resolve the issue. Restarting your printer and rebooting your PC may clear up the issue that leads to your printer printing blank pages. Here’s what you should do:
- Press the power button on your printer to turn it off.
- When it shuts down, unplug it from your computer and the power outlet.
- Restart your PC.
- When your PC has restarted, plug your printer in and start it up.
- Print a test page to check whether it is working properly.
3. Fix Ink/Toner Cartridge Issues
The next step is to ensure you’ve installed your ink cartridges properly. Refer to your printer manual to remove and inspect them for any damage or incorrect installation.
If your cartridge is new, check that removed the protective plastic tab. Once you’ve made sure that your printer’s cartridges are properly fitted, check their ink levels. These are all possible reasons your printer prints blank pages.
Follow these steps to check ink levels on Windows:
- From the Control Panel, go to the Devices and Printers option.
- Right-click on your printer and select Printer properties.
- Under the Maintenance tab, click on the View Printer Status button.
- Look under the Estimated ink levels section to see how much ink you have left.

Here’s how to check printer ink levels on Mac:
- Open System Settings via the Apple menu.
- Click on the Printers & Scanners option.
- Select your printer and click on the options button.
- The information you need should be under the Supply Levels tab.
Some printers let you check these levels directly from the screen on the printer. Here’s how to do that:
- On your printer’s display, go into the setup or settings options.
- Look for a Tools option, and click on an Estimated Ink Levels option.
If the levels are low, you may need to change your ink or toner cartridges. Consult your manual on how to install printer cartridges.
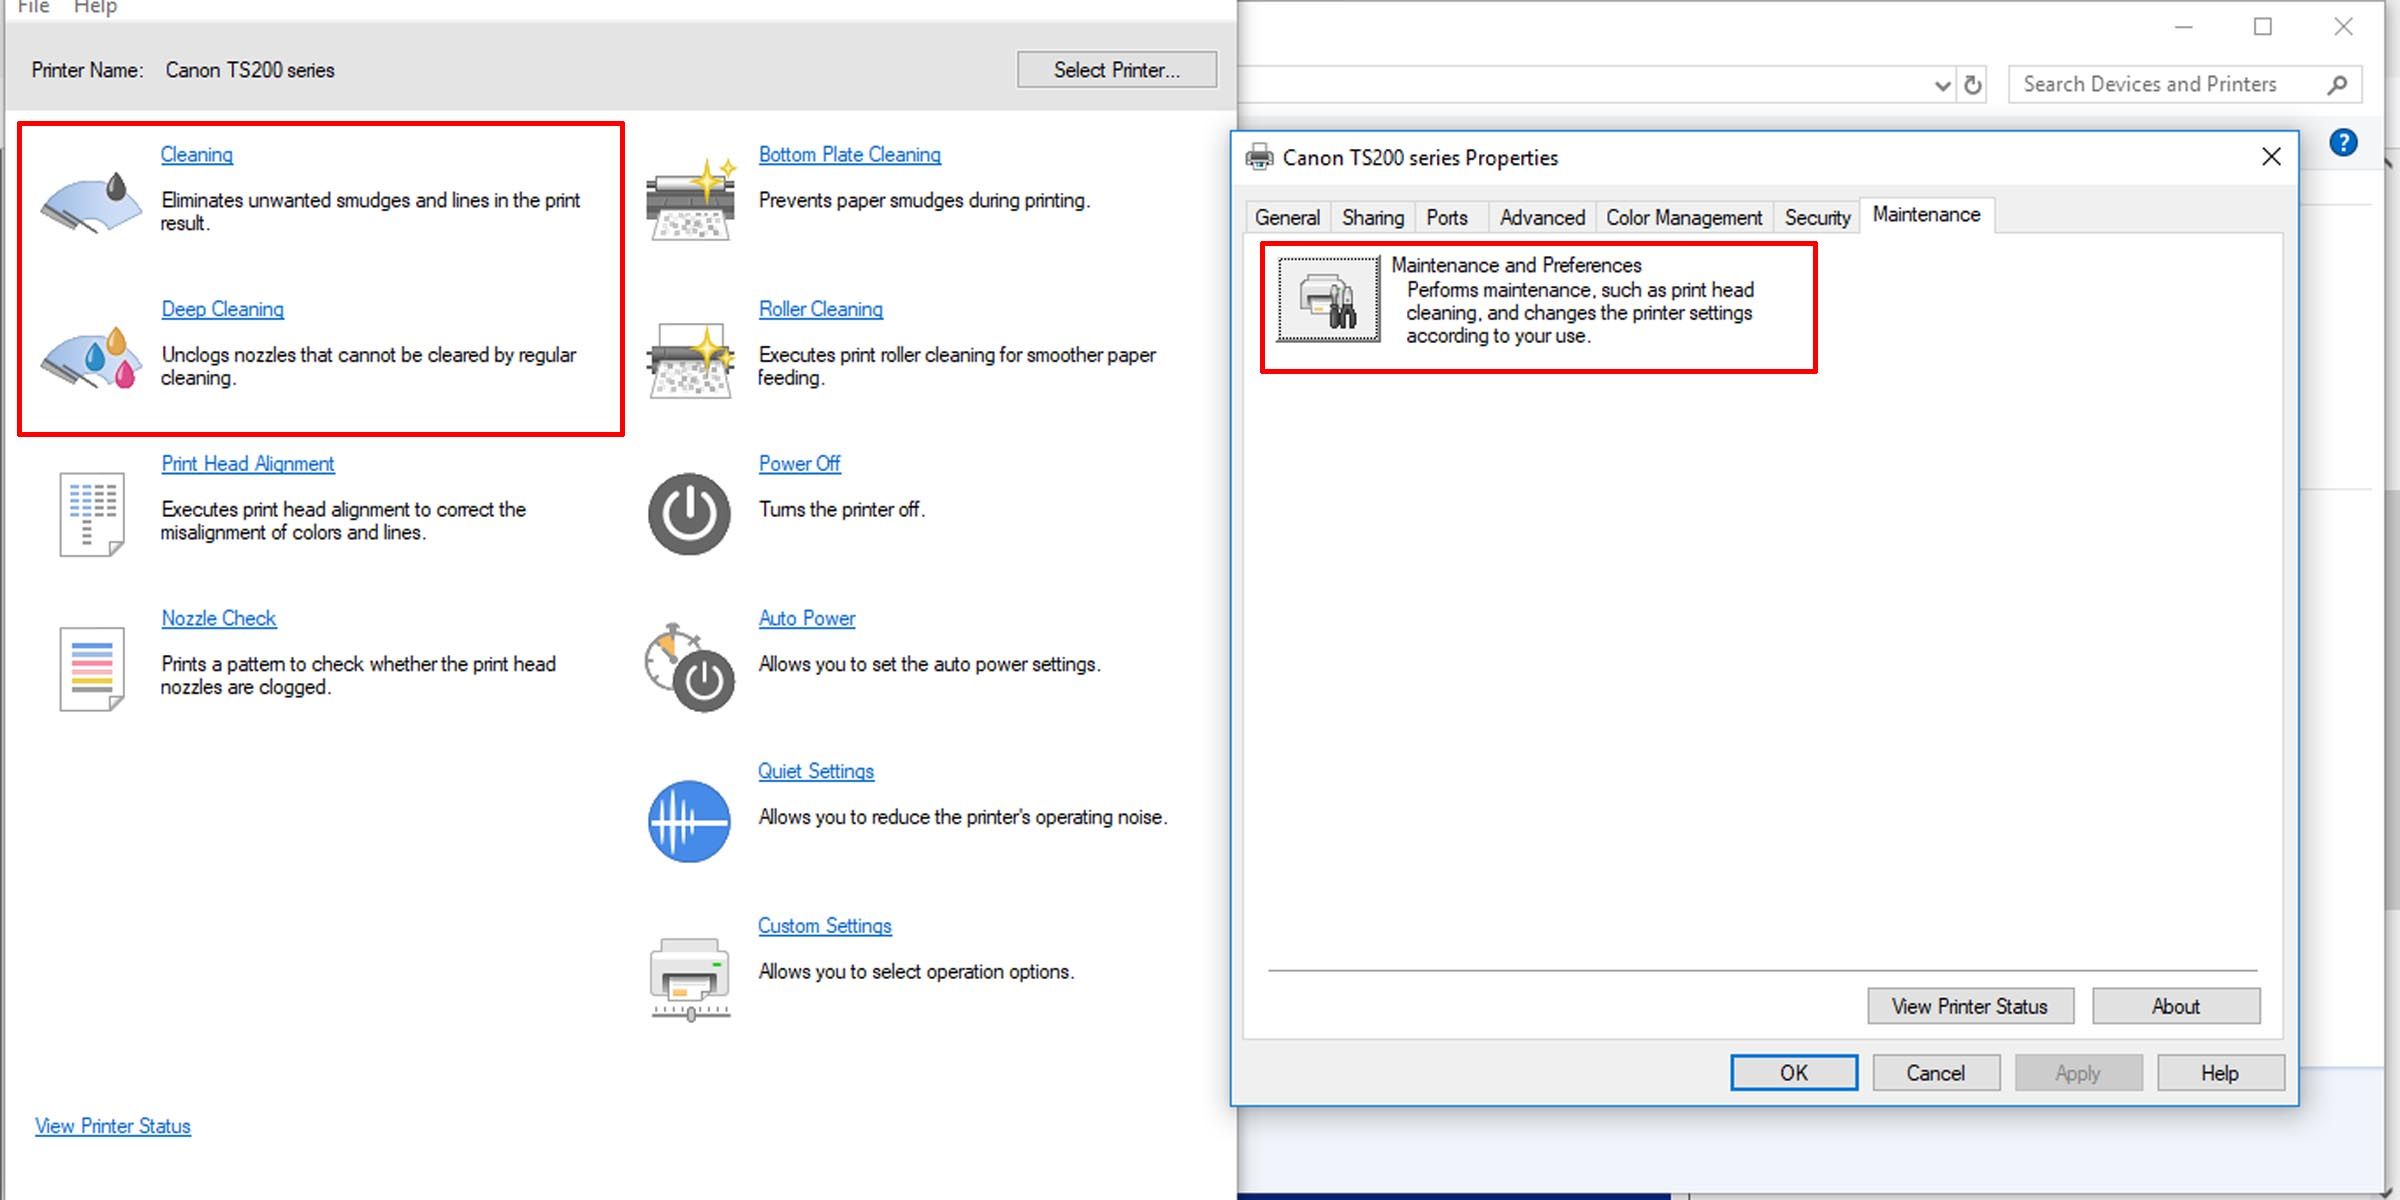
4. Unclog the Print Head
If your printer is printing blank pages all of a sudden, it could be an issue with the print head.
The print head sits on the bottom of the cartridge and sprays ink onto the paper through microscopic holes. These tiny holes can get clogged, leading to imperfect or disordered printing. You can often clear up simple clogs by running a cleaning cycle, and here’s how. Just make sure to have paper inserted in the printing in-tray.
On Windows
- Go to Devices and Printers in Control Panel.
- Right-click on your printer and select Printer properties.
- Under the Maintenance tab, click on Maintenance and Preferences.
- Perform a regular cleaning or deep cleaning.
On Mac
- Go to System Settings > Printers & Scanners under the Apple menu.
- Under printer options, in the Utility tab, click on the Open Printer Utility button.
- Under the Control menu, select Maintenance.
- Click on Print Head Cleaning and follow the on-screen options to run a cleaning.
With more serious clogs, you’ll need to get hands-on. You can try cleaning the offending cartridge with a paper towel and moistening it with an alcohol-based solvent. Just make sure not to handle the electrical contacts on your cartridge, as this might render it unusable.
5. Align the Printer Cartridges
If your printer’s cartridges have not been installed properly, you may see misaligned or skewed printing. To align your printer’s cartridges, follow these steps on Windows:
- Go to Control Panel > Devices and Printers.
- Right-click on your printer and select Printing Preferences.
- Under the Maintenance tab, click on Maintenance and Preferences.
- Look for the option to align the print head and follow the on-screen instructions.
Again, make sure to have paper inserted into the printer before you start.
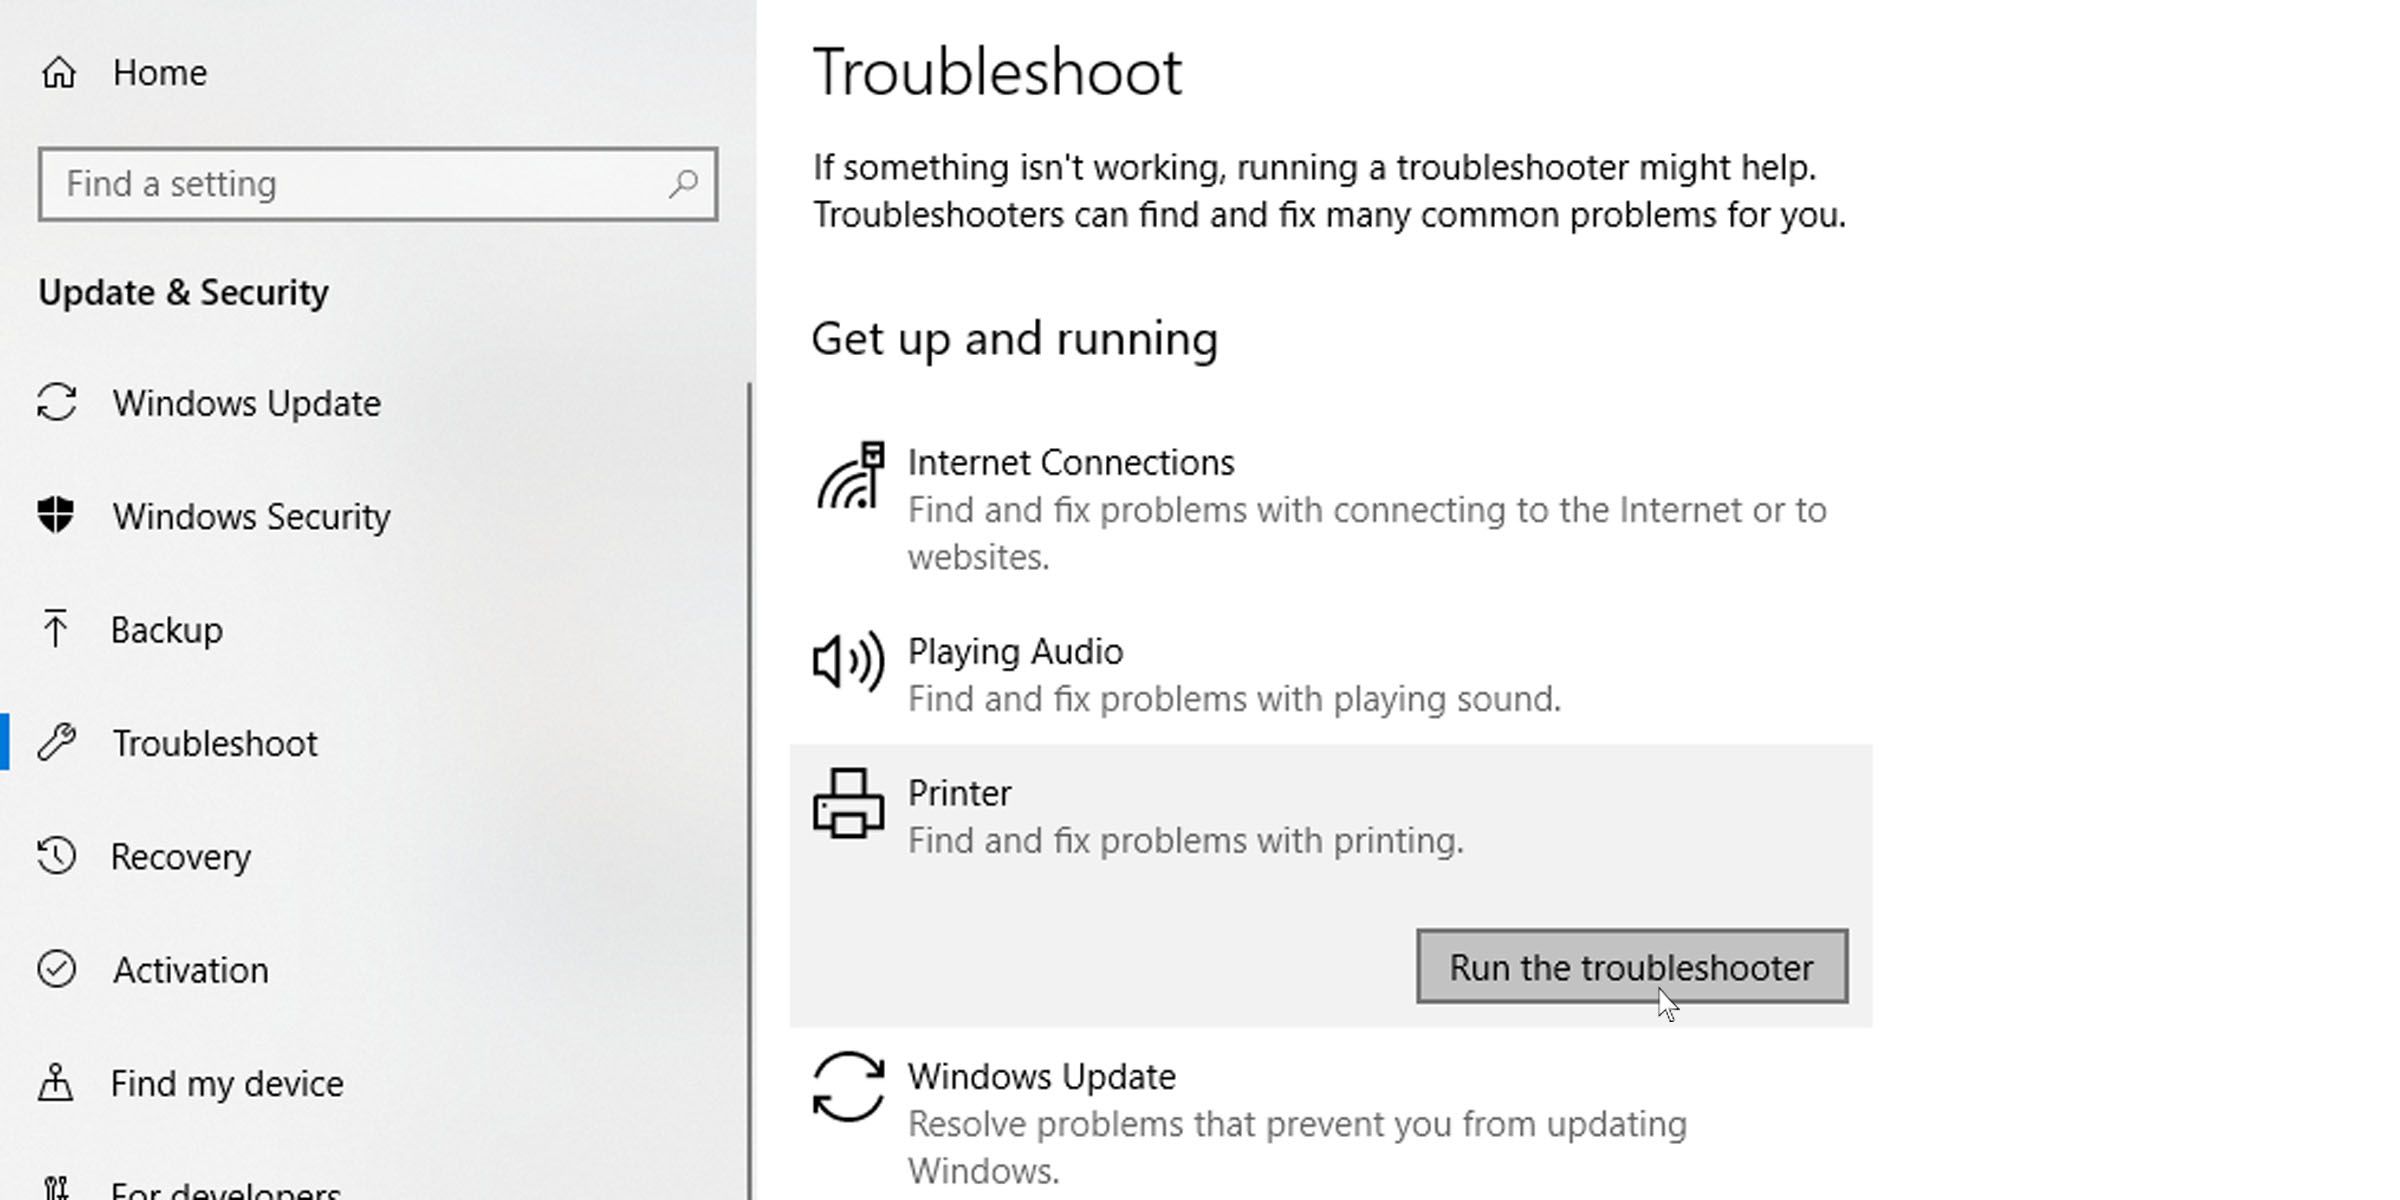
6. Run the Printer Troubleshooter on Windows
Running a troubleshooter for your printer should, in most cases, be able to identify and resolve the issue. Here’s how to run the printer troubleshooter:
- Click on the Start menu and go to Settings.
- Click on Update & Security and navigate to the Troubleshoot tab on the left.
- You’ll find the printer troubleshooter under the Get up and running section.
7. Update Printer Drivers
Printer manufacturers often update their drivers. To keep your printer up to date, visit the driver webpage of your printer’s manufacturer and look for your model. Download and install the latest printer drivers and print a one-page document to check whether this has resolved the problem.
If you have conflicting drivers on your Mac, follow this guide on finding and correcting potential driver conflicts.
8. Print Directly to the Printer
Printer spooling allows for printing tasks to complete faster and in the background, so that they don’t use a lot of resources at once. But sometimes, it can also lead to your printer printing blank or nearly blank pages. Here’s how to disable printer spooling on Windows.
- In the Control Panel app, go to Devices and Printers.
- Right-click on your printer and select Printer properties.
- Under the Advanced tab, select the Print directly to the printer option.
9. Check Whether You Are Printing Only Data
Certain print settings can play havoc with your prints. Try this Word-specific solution: uncheck the option to print only the data from a form under Microsoft Word’s advanced options.
10. Check and Reinstall Missing Fonts
Some printing errors can be caused by missing or improperly installed fonts. Check to see whether the document you are trying to print has custom fonts. If it does, you may need to reinstall them for your prints to be accurate. There are many resources online where you can get free fonts.
Other Possible Causes
Some printer manufacturers offer subscription packages, such as HP’s Instant Ink service, which could cause printer issues. If you are subscribed to such a service, check on your subscription, although this shouldn’t lead to the printer printing blank pages.