
My 144Hz monitor hiccups during a firefight and suddenly my whole team is back at the lobby. One frame, one bad moment, and your carefully earned loadout is gone. I want you to stop losing games to system hiccups.
I’ve spent hours testing Marathon on PC and controller, tuning settings the way a mechanic tunes a race car. You’ll get concise choices that favor high FPS and near-zero input lag so your aim feels sticky and your runs don’t end because the GPU decided to take a coffee break.
When dense map areas choke your FPS — Best Marathon PC Graphics Settings
Marathon’s art style looks great but it can hide performance traps. I strip the menu of cinematic effects and tune what matters: frame stability, input latency, and clear visual cues for enemies and other Runners.
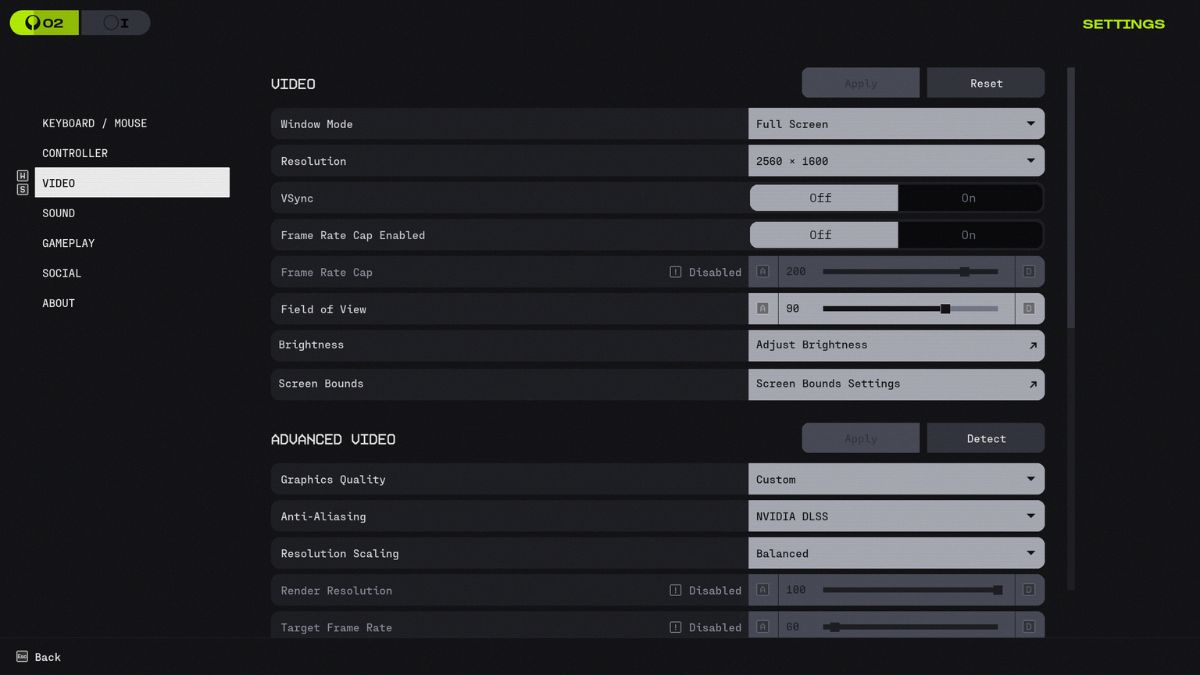
Set video options to favor steady frames over pretty frames. These settings reduce stutters in crowded firefights and give you predictable, sliceable performance you can train your aim around.
Here are the best Marathon PC graphic settings you should set your game to:
| Feature | Best Setting | Why It Helps |
|---|---|---|
| Window Mode | Fullscreen | Best for performance and minimizing system latency. |
| Resolution | Native | Use your monitor’s native resolution to avoid blurry textures. |
| VSync | Off | Keep VSync off to avoid heavy input lag in matches. |
| Frame Rate Cap | Off | No need to cap FPS unless playing on laptop battery power. |
| Field of View | 80–95 | Higher FOV provides awareness but can tax FPS; 90 is a sweet spot. |
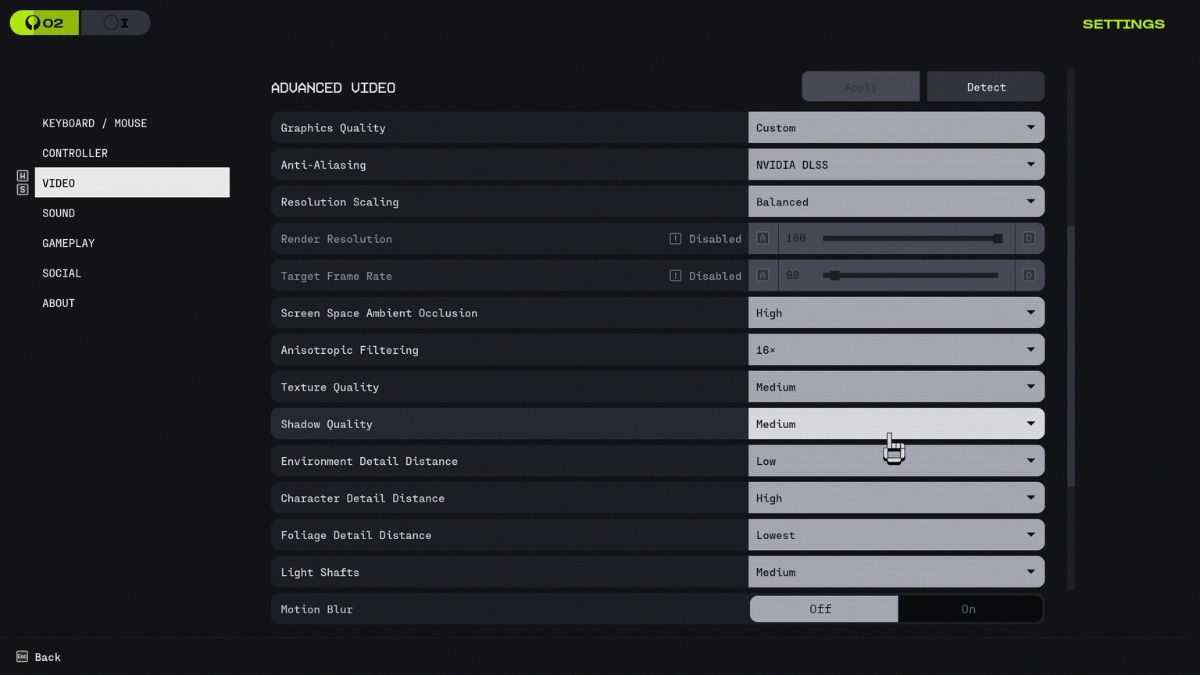
| Graphics Quality | Custom | Fine-tune settings individually for the best performance balance. |
| Anti-Aliasing | DLSS / FSR | Use DLSS for Nvidia RTX cards; FSR is a great alternative for others. |
| Resolution Scaling | Balanced | Upscales from 50% base resolution for major performance gains. |
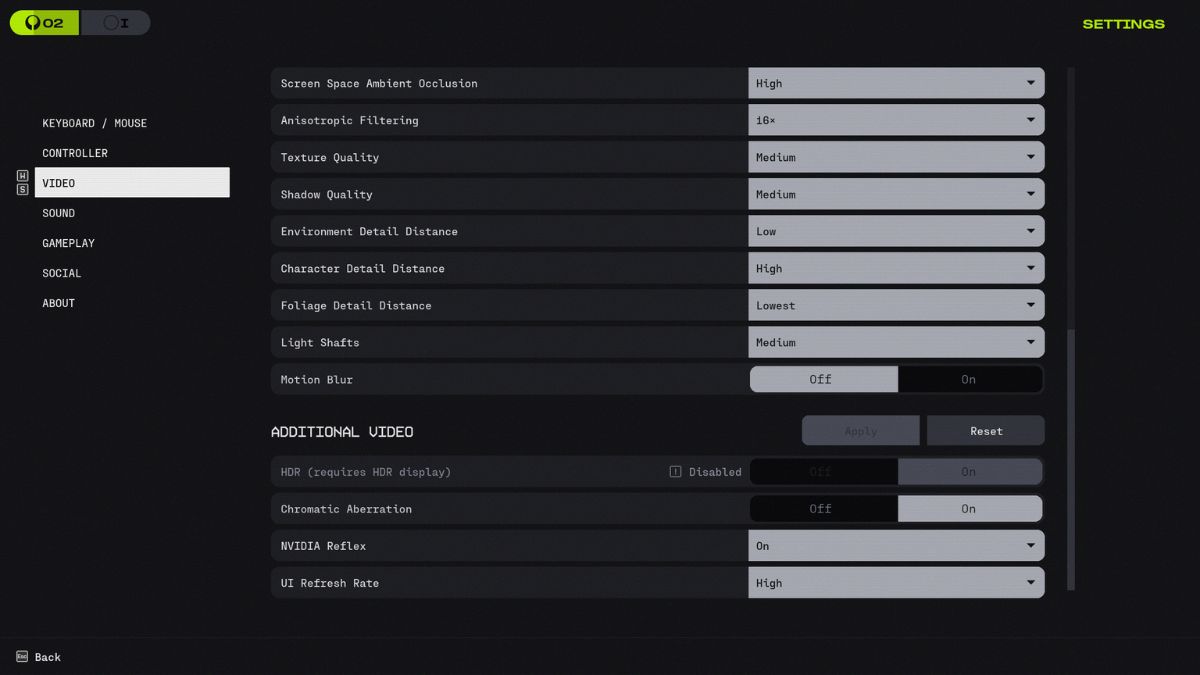
| SSAO | High | Adds noticeable depth to environments without killing your frames. |
| Anisotropic Filtering | 16x | Improves texture clarity at angles with negligible performance cost. |
| Texture Quality | VRAM Dependent | 6GB: Low 8GB: Medium 12GB+: High/Highest. |
| Shadow Quality | Medium | Stable visuals without flickering or massive GPU load. |
| Env. Detail Distance | Low | Reduces random drops in denser areas of the map. |
| Char. Detail Distance | High | Ensures enemies/Runners render clearly at long distances. |
| Foliage Detail Dist. | Lowest | Improves visibility and provides a huge boost to average FPS. |
| Light Shafts | Preference | Purely aesthetic; use according to your visual taste. |
| Motion Blur | Off | Vital for maintaining clarity during fast-paced combat. |
| Chromatic Aberration | Preference | Post-processing effect that does not impact performance. |
| Nvidia Reflex | On | Keeps inputs snappy and minimizes lag for Nvidia users. |
| UI Refresh Rate | High | Keeps HUD elements smooth during intense, effect-heavy fights. |
Why foliage matters: setting Foliage Detail Distance to Lowest doesn’t just lift FPS; it shifts the tactical balance. Dense grass and bushes stop rendering at range, which removes a favorite hiding spot for rival Runners.
If your GPU is running out of VRAM—especially on the Tiger Engine—drop Texture Quality until stuttering stops when you sprint. DLSS (Nvidia RTX cards) acts like a time machine for frames, while AMD FSR is the practical alternative if you’re on Radeon or a GTX card.
How do I get higher FPS in Marathon?
Lower environmental draw, drop shadow detail, and use resolution scaling. Those three moves unclog the GPU more than chasing every slider to Low.
Does DLSS or FSR hurt aim clarity?
No—both upscale intelligently. Use Performance mode for major FPS gains and Balanced if you want cleaner edges. If you’re running a high-refresh monitor, pair DLSS or FSR with Offline frame pacing tools from Nvidia or AMD when possible.
When your aim feels sluggish after a sprint — Best Marathon Controller Settings
You’ll notice the difference the moment you swap from default to a tuned profile: tighter tracking, fewer overcorrections, more wrested wins. I test controllers on both pad and pro sticks to find a reliable sweet spot you can muscle-memory into.

Controller tuning is about predictability. You want the stick to move exactly as your thumb intends, not as the game guesses.
| Feature | Best Setting | Why It Helps? |
|---|---|---|
| Look Sensitivity | 5 – 7 | The “Sweet Spot.” Fast enough to 180°, stable enough for mid-range. |
| ADS Sensitivity Modifier | 1.0 | Maintains a 1:1 muscle memory ratio between hip-fire and aiming. |
| Aim Response Curve | Linear | Removes artificial acceleration for raw, predictable stick input. |
| Vertical/Horizontal Inversion | Not Inverted | Standard for modern shooters; keeps navigation intuitive. |
| Axial / Radial Dead Zone | 0.5 | High enough to prevent stick drift, low enough for micro-adjustments. |
| Autolook Centering | Off | Prevents the camera from fighting your manual aim during parkour. |
| Controller Vibration | Off | Essential. Removes physical interference during high-precision duels. |
| Double Press Delay | Default (233 ms) | The reliable window for inputs like dashing or special abilities. |
Use Linear response and a 1.0 ADS modifier to keep muscle memory consistent between hip-fire and aiming. Turn vibration off—feedback is fine for immersion, but it blurs tiny stick inputs during clutch fights.
If you use a Scuf or other pro pad, map a paddle to melee or dash and leave aim solely to the sticks. Small hardware changes plus clean settings make the difference between a win and booting back to the lobby.
Will lowering foliage really change my matches?
Yes. Removing long-range vegetation turns hiding spots into open lines of sight, making tracking and prediction simpler. That’s why competitive players prune visual clutter for advantage.
I test these settings across Steam builds and on both RTX and Radeon hardware. Bungie’s Marathon runs on the Tiger Engine, which is efficient but VRAM-hungry—so respect your GPU’s limits. Use Nvidia Reflex if you have an RTX card; pair DLSS or FSR to lift frames without losing critical clarity.
Try this profile for a single session, then tweak the FOV and sensitivity in small steps until it feels like second nature. One clean adjustment today saves you a dozen lost loadouts tomorrow—what will you change first?