
I was three minutes into a nightmare queue when our frontline folded and the boss walked unchallenged to my backline. I swapped to the Hunter mid-fight and watched the whole room freeze—literally and figuratively. You’ll remember the first time a single bolt rewrote the pace of a run.
On late-night raids the Hunter is often the one you blame — Best Hunter build in TBH: Task Bar Hero
I play and test builds until they break. You need a Hunter that dishes raw damage, controls space, and survives just long enough to matter.
The Hunter’s job is simple: hit hard from distance and make enemies useless while your team finishes them off. She behaves differently from the Ranger—she trades single-target volume for area control and crowd disruption. The Hunter is a glass needle, deadly precise but fragile.
How do I build a Hunter in TBH: Task Bar Hero?
Start with the class because the Hunter is one of the two paid options—expect a price around $4.99 (€5) if you pick her on Steam. Once you have her, focus your early points on abilities that define her playstyle: area damage and crowd control.
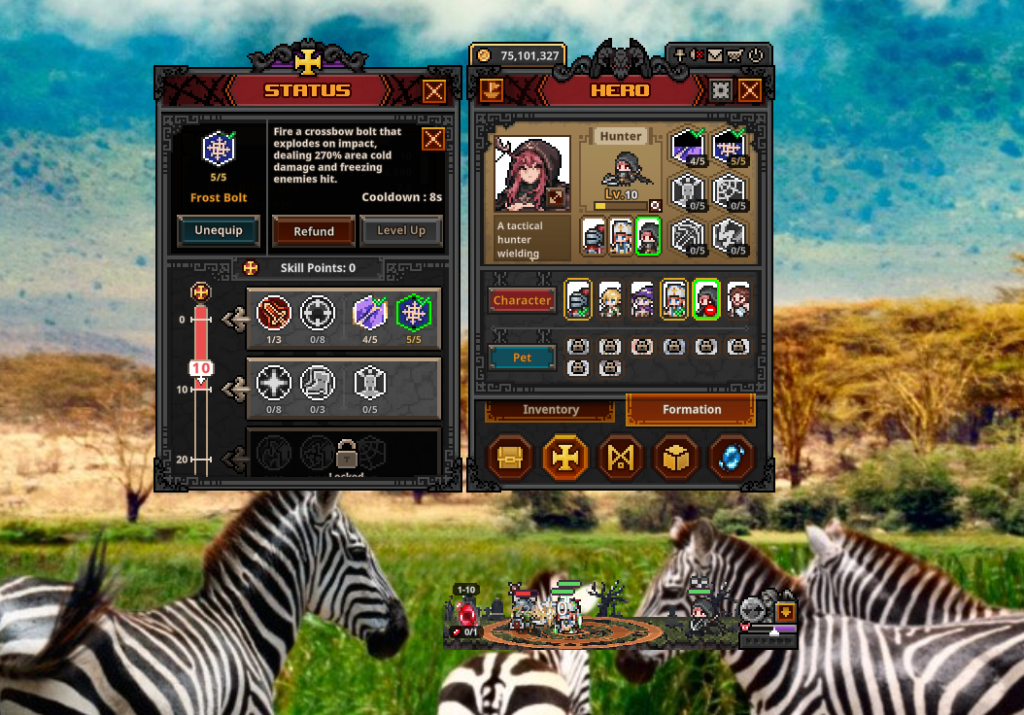
- Frost Bolt — Fires a bolt that explodes and freezes enemies inside the blast. It deals heavy area damage (255% listed on the tooltip) and gives your team time to reposition. Use this early and often; Frost Bolt is the single most reliable tool for turning a messy fight into a controlled one.
- Explosive Bolt — A fire-based impact shot with a large AoE that punishes grouped enemies. When paired with Frost Bolt it destroys trapped foes. Her bolts are miniature grenades when they detonate.
What skills should I prioritize for Hunter?
Think like an investor: pick the nodes that compound each other. I bias toward damage, crit, and cooldown because those three turn the Hunter from utility into threat.
- Attack Damage — Raises raw numbers across the board. Every point matters.
- Critical Chance Enhancement — Makes your hits and abilities follow up with bigger results.
- Critical Damage — Combine with crit chance to burst down priority targets.
- Fire Damage & Cold Damage — Stack both to boost Explosive and Frost Bolt respectively.
- Cooldown Reduction — Shorter cooldowns mean more windows to control fights.
- Area of Effect — Spend leftover points here to widen your lethal footprint.
Gear should mirror the tree: prioritize Attack Damage, Critical Damage, and Cooldown Reduction on weapons, ornaments, and decorations.
In pickup matches the right partners rewrite every encounter — team composition and role fit
I experiment with dozens of parties. The Hunter wants a buffer and a bodyguard.
- Pair with a Knight — The Knight anchors fights and draws aggro so the Hunter can poke from safe angles.
- Pair with a Priest — Heals and occasional crowd saves keep the Hunter alive long enough to stack damage.
- A Hunter + Knight + Priest forms a balanced triangle: control, sustain, and sustained damage.
A quick contrast: I tried a Hunter + Ranger + Priest trio and the DPS overlap left gaps in crowd control. If you want clean waves and fewer panic swaps, the Knight-Priest setup is the better bet.
On progression and quality-of-life decisions — what to spend on and why
When you spend currency or time on the Hunter, aim for upgrades that speed her rotation and amplify bursts.
- Prioritize decorations that shave seconds off cooldowns.
- Trade a small DPS upgrade for a big cooldown reduction if it means one extra cast per fight.
- Use community tools—Steam guides, the official Discord, and coverage from outlets like Moyens I/O—to check meta changes and build permutations.
I test builds in Steam lab sessions and tune the Hunter until she feels less like a liability and more like a win condition. Which bolt will you bet the next run on?