
I opened the shop and a drawer stared back at me like a missing tooth. The colors were right but the order was wrong, and every misplaced die felt like a whisper that the inventory had betrayed me. You can stop that slow bleed—I’ll walk you through the exact spots so nothing goes missing again.
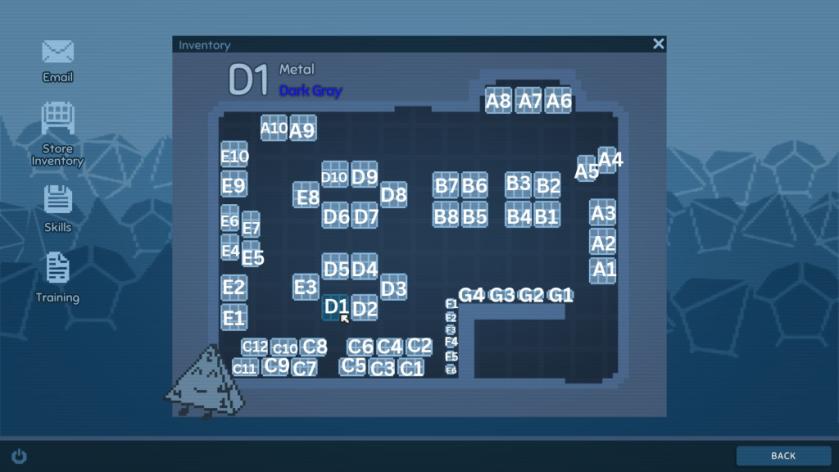
A crooked shelf tells you the shop is unfinished — Complete Inventory map in Dice Hoarder
I’ll be blunt: the restore order isn’t random. You do two things every time you return dice to their slots. First, sort by base material. Second, place by color inside that material’s rack. The map above is color coded for that second step so you don’t have to guess.
One quick note from my runs: Solid Resin occupies two racks in the shop (the B and G sections). Think of the map as a compass for chaos — follow it and the shop stops arguing with itself.
Where do I put my dice in Dice Hoarder?
When you pick a die, read two labels: the base material and the visible color. Match the base to its rack below, then place the die in the slot whose color name matches. If the die is Solid Resin, check whether it belongs to the B rack (primary resin display) or the G rack (secondary resin shelf).
The shop has lanes like grocery aisles — the materials are grouped, then colored
Below is every rack and its assigned colors. Use this as your cheat-sheet: sort into these seven material groups, then drop each die into the matching color slot.
Materials and slots
Plastic
- A1: Light Green
- A2: Orange
- A3: Red
- A4: Dark Purple
- A5: Sunset Dreamer
- A6: Light Blue
- A7: Pink
- A8: Yellow
- A9: Dark Forest
- A10: Butterfly Blue
Solid Resin (B rack)
- B1: Sunset
- B2: Light Green
- B3: Light Purple
- B4: Dark Purple
- B5: Lollipop Red
- B6: Orange
- B7: Light Blue
- B8: Light Pink
Clear Resin
- C1: Yellow
- C2: Pink
- C3: Red
- C4: Light Green
- C5: Cherry Blossom
- C6: Dark Blue
- C7: Sunlight
- C8: Dark Purple
- C9: Night Sky
- C10: Fire Dragon
- C11: Orange Liquid Core
- C12: Purple Liquid Core
Metal
- D1: Dark Grey
- D2: Light Green
- D3: Orange
- D4: Dark Blue
- D5: Light Blue
- D6: Light Purple
- D7: Dark Purple
- D8: Red
- D9: Pink
- D10: Yellow
Gemstone
- E1: Yellow Agate
- E2: Orange Granite
- E3: Red Tiger’s Eye
- E4: Lepidolite
- E5: Turquoise
- E6: Marble Gold
- E7: Jade Gold
- E8: Rose Quartz
- E9: Amethyst
- E10: Cyan Imperial Stone
Special
- F1: Purple Prism
- F2: Ceramic Blue
- F3: Red Dragon Eye
- F4: Galaxy
- F5: Cheese
- F6: Bone
Solid Resin (G rack)
- G1: Yellow
- G2: Pink
- G3: Red
- G4: Dark Blue
How do I read the inventory map in Dice Hoarder?
The map is color-first inside a material group. Open the inventory, note the die’s base (Plastic, Clear Resin, Metal, etc.), then match the die’s visible color to the slot name on the map. If a die has two dominant colors, choose the slot that matches the most obvious hue—players on Steam and Reddit tend to agree this solves 90% of edge cases.
Why does Solid Resin appear twice on the map?
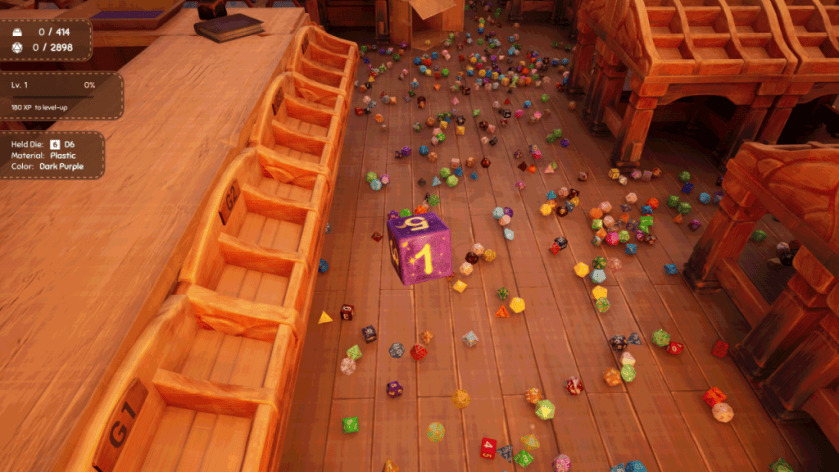
The shop splits Solid Resin between two displays: B holds the main resin lineup and G is a compact secondary shelf. Treat them as separate racks when you’re restoring. This split is the reason you’ll see two different color sets labeled Solid Resin on the map.
I’ve tested this on Switch and Steam builds and cross-referenced a Moyens I/O screenshot to avoid guesswork; use the map and you’ll cut restore time to a minute. Your shop will stop feeling like a scatter of icons and start feeling intentional — like a museum of tiny storms. Ready to claim which shelf you protect first?